Backprompter Documentation
Everything you need to build, test, and ship AI agents — from your first system prompt to a production chat UI for your users.
What is Backprompter?
Backprompter is an AI agent development and deployment platform. It gives developers a workspace to create and refine AI agents (via system prompts), chat with them interactively, run structured evaluations, and then deploy a polished chat interface for end users — all without writing any backend code.
Ways to Use Backprompter
Build and test your agents with the Backprompter UI and deploy them in multiple ways:- Deploy a chat interface for end users with no backend or frontend code — details · tutorial
- Use Backprompter SDK on your frontend code with Backprompter's authentication — details · tutorial
- Use Backprompter SDK on your minimal backend code with your Backprompter API key — details · tutorial
Core Concepts
App
An application for your users. An app contains agents and app-related files that your agents can use to respond to your users.
Agent
An AI assistant defined by configurations like system prompt, model, and other parameters. Agents live inside an app.
Teammate
Someone invited to build on one of your apps with their own account. The app's creator is its owner; everyone invited is an editor. See Inviting Teammates.
Mock User
A synthetic end-user profile used during testing. Provides realistic user context to the agent.
Version
A snapshot of an agent's configuration at a point in time. Versions let you compare and roll back changes.
Evaluation
A scored record of a conversation — human feedback, an AI evaluator score, and notes. Stored for later review.
Getting Started
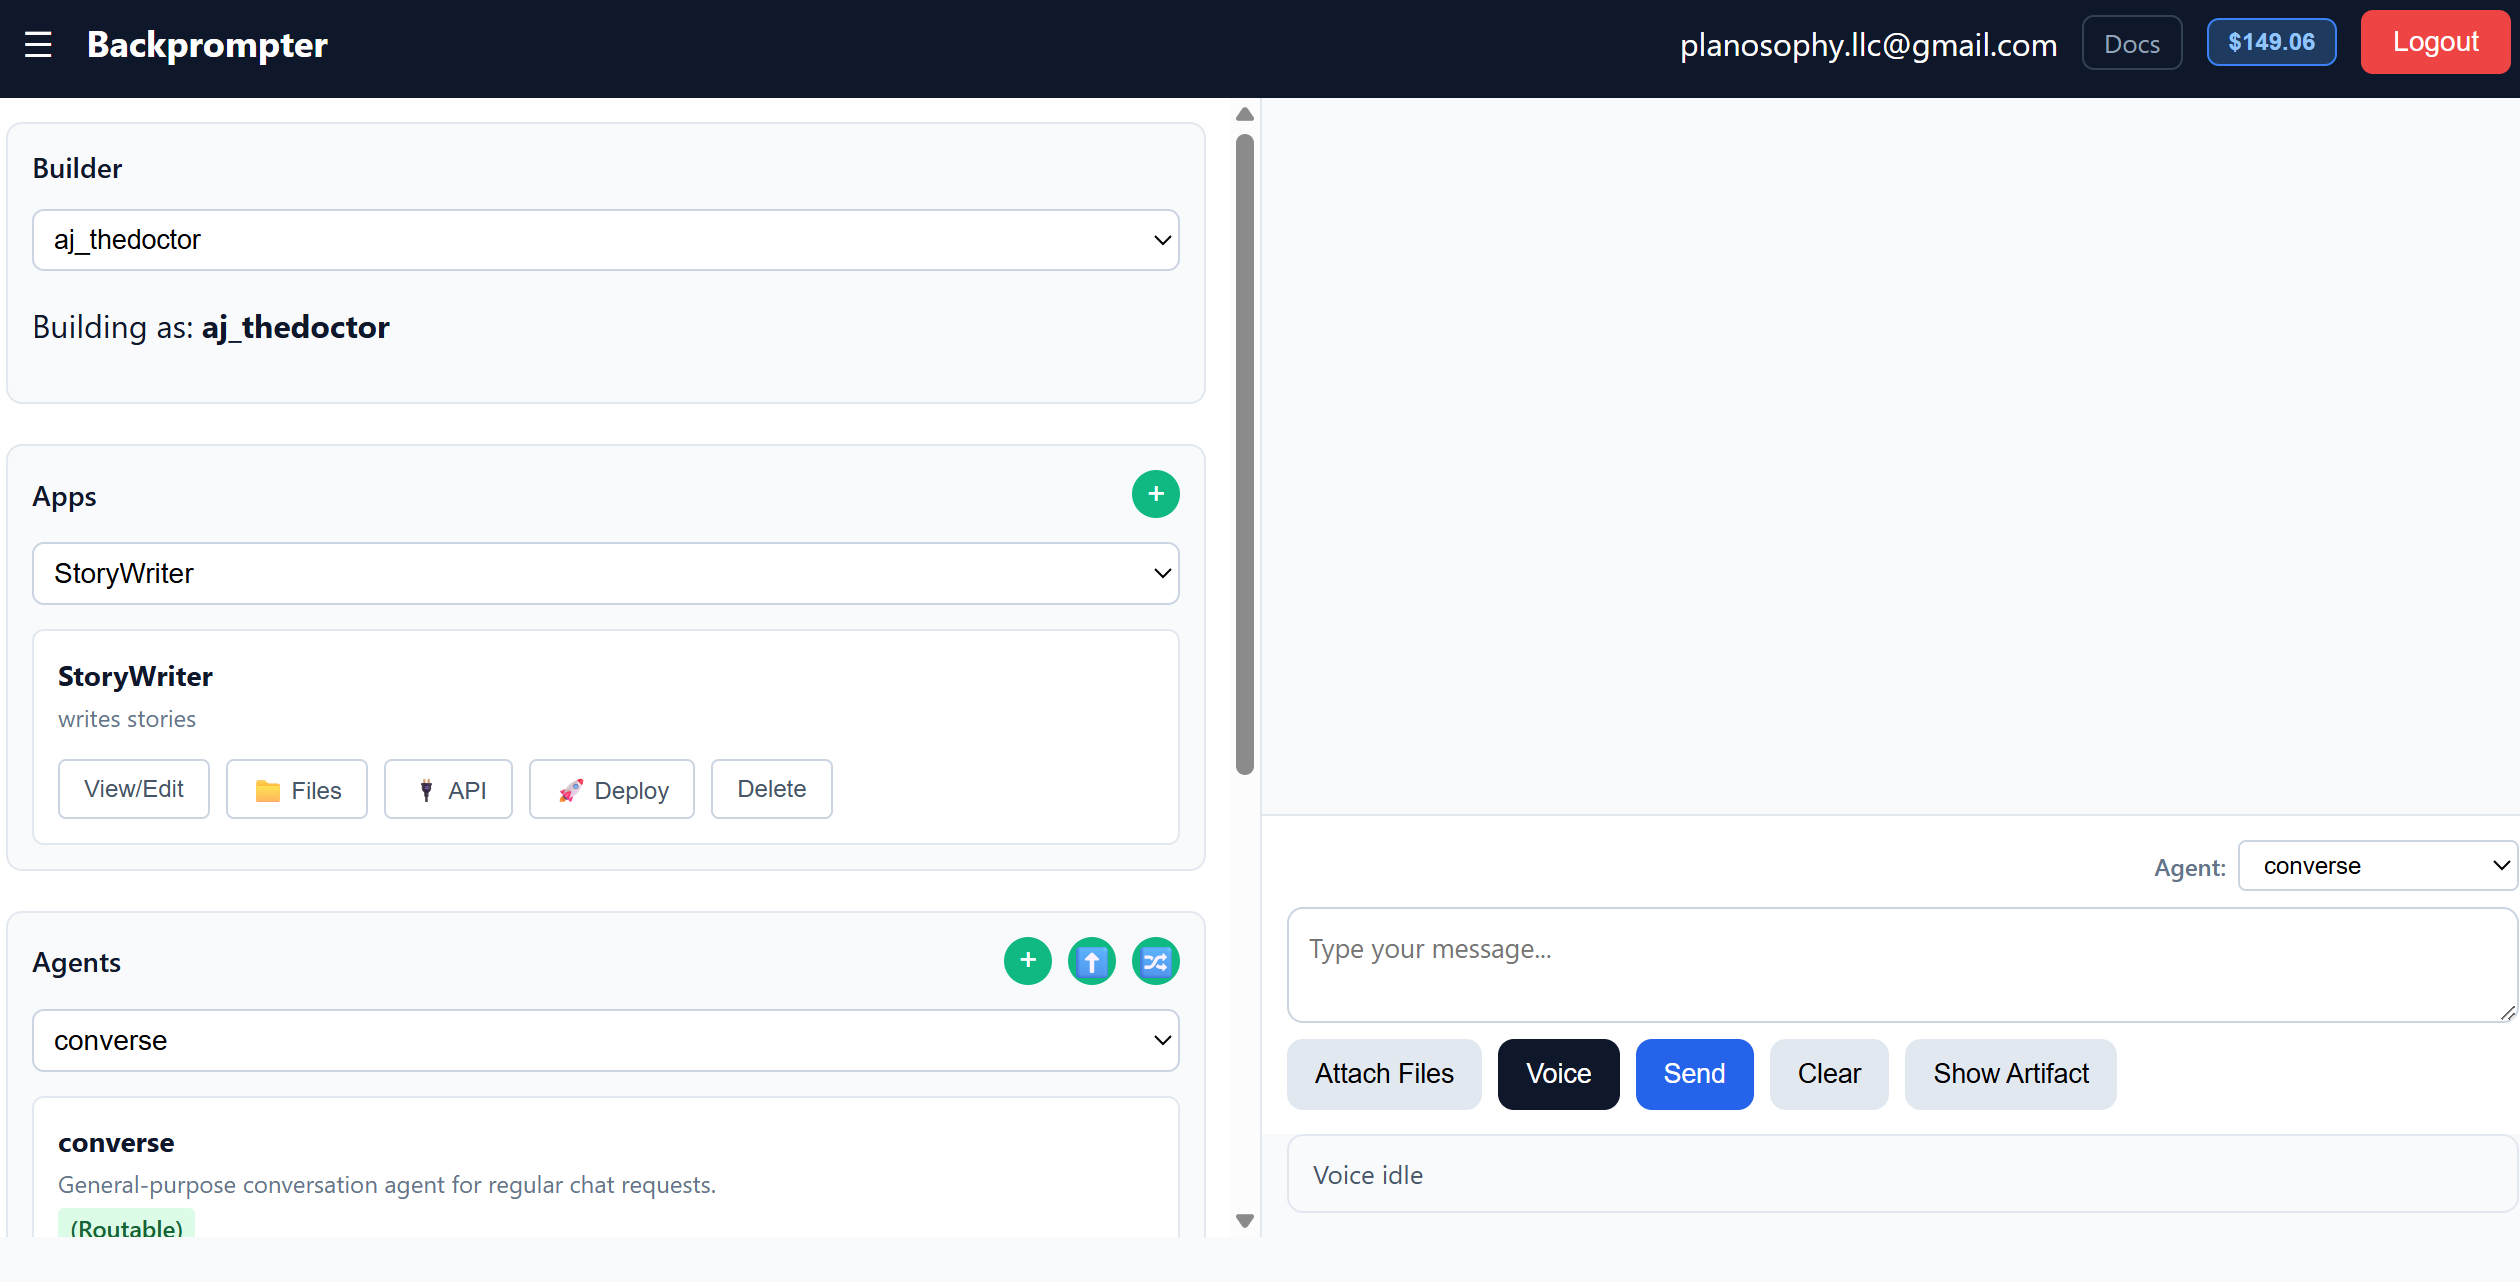
After signing in, the main Backprompter UI is divided into a left sidebar for configuration and a right chat pane for testing.
1. Create an App
- Click the + button next to Apps in the sidebar.
- Give the app a name and optional description.
- You don't need to have an OpenRouter or OpenAI API key. But if you want to use your own keys you can optionally enable Bring Your Own Keys (BYOK) to supply your own OpenRouter and/or OpenAI API key.
- Click Save. The app now appears in the Apps dropdown.
2. Create an Agent
- Select your app in the Apps dropdown.
- Click + next to Agents.
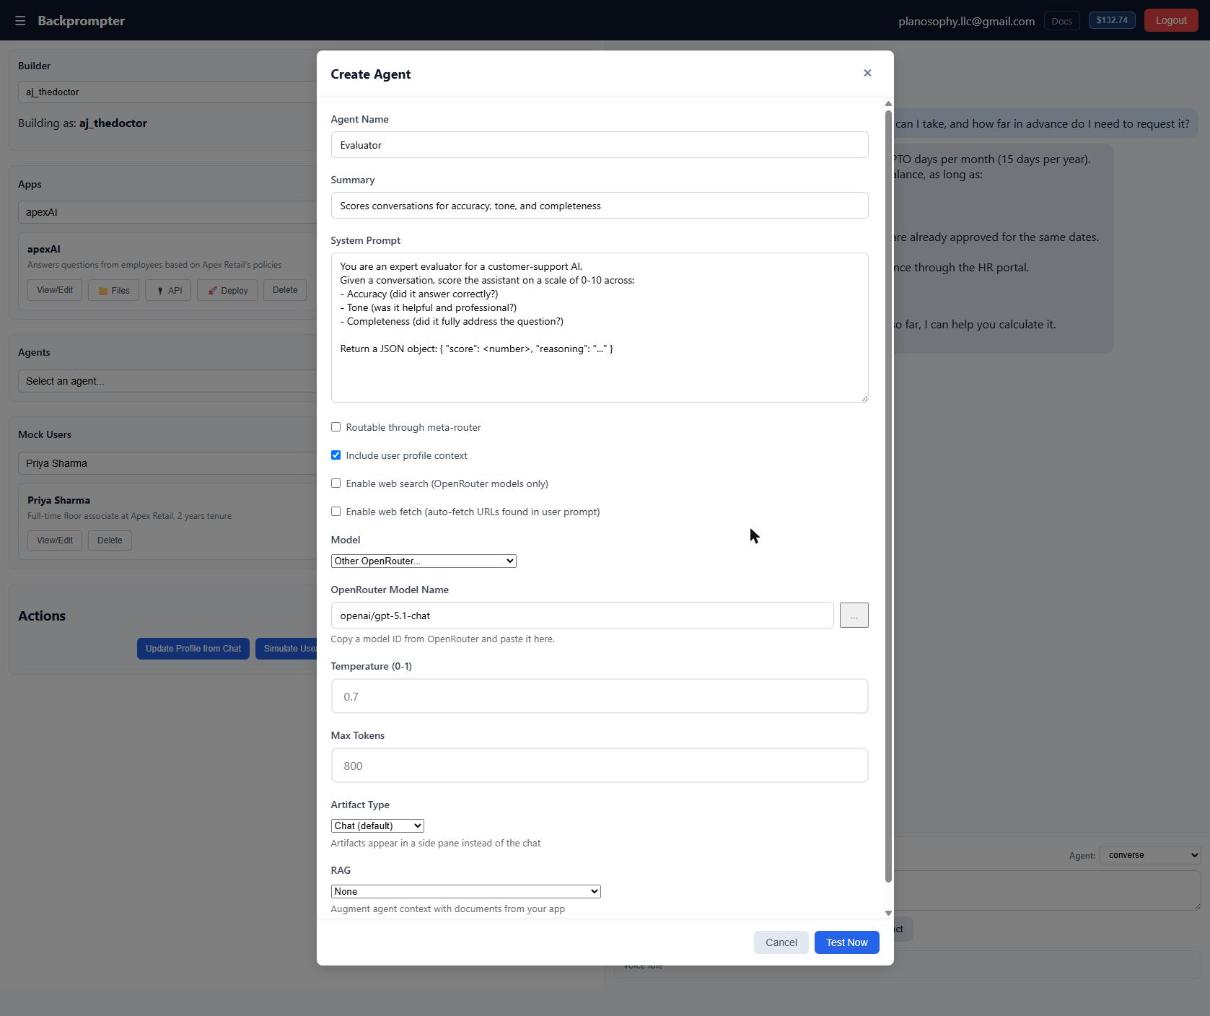
- Fill in the Name and Summary fields.
- Write the System Prompt — this defines the agent's behavior and personality.
- Configure the model, temperature, max tokens, artifact type, and RAG source (see below).
- Click Test Now to immediately start chatting, or Save and Commit to save as a committed version which you can reload anytime.
Agent Configuration Options
When creating or editing an agent, you can configure:
-
Model — pick from the presets (e.g.
openai/gpt-5.3-chat,anthropic/claude-3-haiku) or select Other OpenRouter… and paste any model ID from openrouter.ai/models. - Temperature — controls randomness (0 = deterministic, 1 = creative).
- Max Tokens — caps the length of each response.
-
Artifact Type — controls how responses are displayed in Backprompter's UI:
- Chat — standard response that appears in the main chat area.
- Markdown Artifact — rendered markdown in a side pane.
- HTML Artifact — rendered HTML in a side pane.
- Charts — rendered charts in a side pane.
- Code Execution (JS over CSV data) — the agent writes JavaScript that runs in a secure in-browser sandbox over CSV data you attach; the computed result is shown. See Data-Analysis Agents.
- RAG — set to Knowledge Base to augment the agent's context with documents you've uploaded to the app (see Files & RAG).
- Tools — let the agent call external HTTP APIs mid-conversation. Define tools once at the app level, then tick the ones each agent may use (see API Tools).
- Routable through meta-router — makes this agent a candidate when the meta-router automatically selects an agent from your app (see Meta-Router).
- Include user profile context — prepends the current mock user's profile to the agent's context during testing.
Combo-Agents
A combo-agent is a special agent that orchestrates multiple sub-agents. Once you have built some agents, you can build a combo-agent simply by tagging other agents in the system prompt. You can describe in natural language how and when to call the sub-agents, and the combo-agent will handle the routing and context management automatically.
Example system prompt that creates a combo-agent:
        1. Call @ResearchAgent with the user's question.
        2. If @ResearchAgent is unable to answer, tell the user that the question is out of scope.
        3. If @ResearchAgent is able to answer, pass the result to @SummaryAgent and ask it to produce a one-paragraph summary.
4. Forward the summary to the user.- Sub-agent names must match exactly (case-sensitive) the agent names inside the same app.
Typing
@in the system prompt will trigger an autocomplete dropdown showing all available agents to reference. - As shown in the above example, a combo-agent can synthesize a response on its own based on the sub-agents response and context or forward the sub-agent's response.
Meta-Router
The meta-router automatically picks the best agent to handle a user message. It is useful when a single app contains several specialized agents and you want the system to route automatically.
- To include an agent in the meta-router, ensure Routable through meta-router is checked.
- Click the 🔀 button in the Agents section header to open the routing settings.
- Set a Default agent — used as a fallback when routing confidence is low.
- Optionally enable Prefetch default agent to run the default agent in parallel with routing, reducing latency.
- Click Save.
To test the behavior of meta-router, select Auto in the agent dropdown on the chat interface.
API Tools
API tools let an agent call an external HTTPS endpoint during a conversation to fetch live data (e.g. exchange rates, a product lookup). You describe in natural language when to use it; the model decides to call it, Backprompter runs the request on the server with your stored key, feeds the result back, and the agent answers.
- In the agent editor, under Tools, click Manage app tools….
- Click + Add API tool and fill in:
- Name — the function name the model sees (letters, numbers, underscore), e.g.
get_weather. - Description — when the agent should call it.
- URL — the https endpoint. Use
{param}for path values, e.g.https://api.example.com/weather/{city}. - Parameters — the inputs the model fills; mark each as query or path.
- Auth — optional header or query key. The secret is stored encrypted and never sent to the model or browser.
- Name — the function name the model sees (letters, numbers, underscore), e.g.
- Click Save tools. Back in the agent editor, tick the tools this agent may use, then save the agent.
- Tools are defined once per app and reused — just tick them on each agent that needs them.
- v1 is read-only (HTTP GET); requests to private or internal hosts are blocked.
- Use a model that supports tool calling (e.g. Claude Sonnet). After a run, a 🔧 Tools used note under the reply shows which tool ran and a preview of the result.
Data-Analysis Agents (Code Execution)
Set an agent's Artifact Type to Code Execution to build a data-analysis agent. Instead of answering in prose, the agent writes JavaScript that runs in a secure in-browser sandbox over CSV data you attach, and the computed answer is shown.
- Set Artifact Type to Code Execution (JS over CSV data) and save the agent.
- In the chat, click Data (CSV) to attach one or more CSV files — each becomes a named dataset.
- Ask a question (e.g. “total revenue by region”). The agent generates code, it runs over your data, and the result appears in the artifact pane.
- Only the schema of your data (column names, types, a few sample rows) is sent to the model — the full rows stay in your browser and are never uploaded.
- The generated code runs isolated with no network or page access. Datasets are available as
inputs["name"](andinputfor the first one); the code assigns its result tooutput. - Attached data persists for the conversation, so follow-up questions don't need re-attaching.
Testing Agents
Mock Users
Mock users let you test how an agent responds to different user personas without needing real users. Each mock user has a name, a short summary, and a longer detailed profile that gets injected into the agent's context.
- Click + next to Mock Users in the sidebar.
- Fill in the name, summary, and profile fields.
- Click Save, then select the mock user from the dropdown before chatting.
User Simulation
The Simulate User action in the sidebar's Actions section runs an automated multi-turn conversation. The platform will generate synthetic user messages based on the selected mock user's profile and send them to the current agent automatically (up to 4 turns by default). This is useful for quickly stress-testing an agent without typing manually.
Evaluation
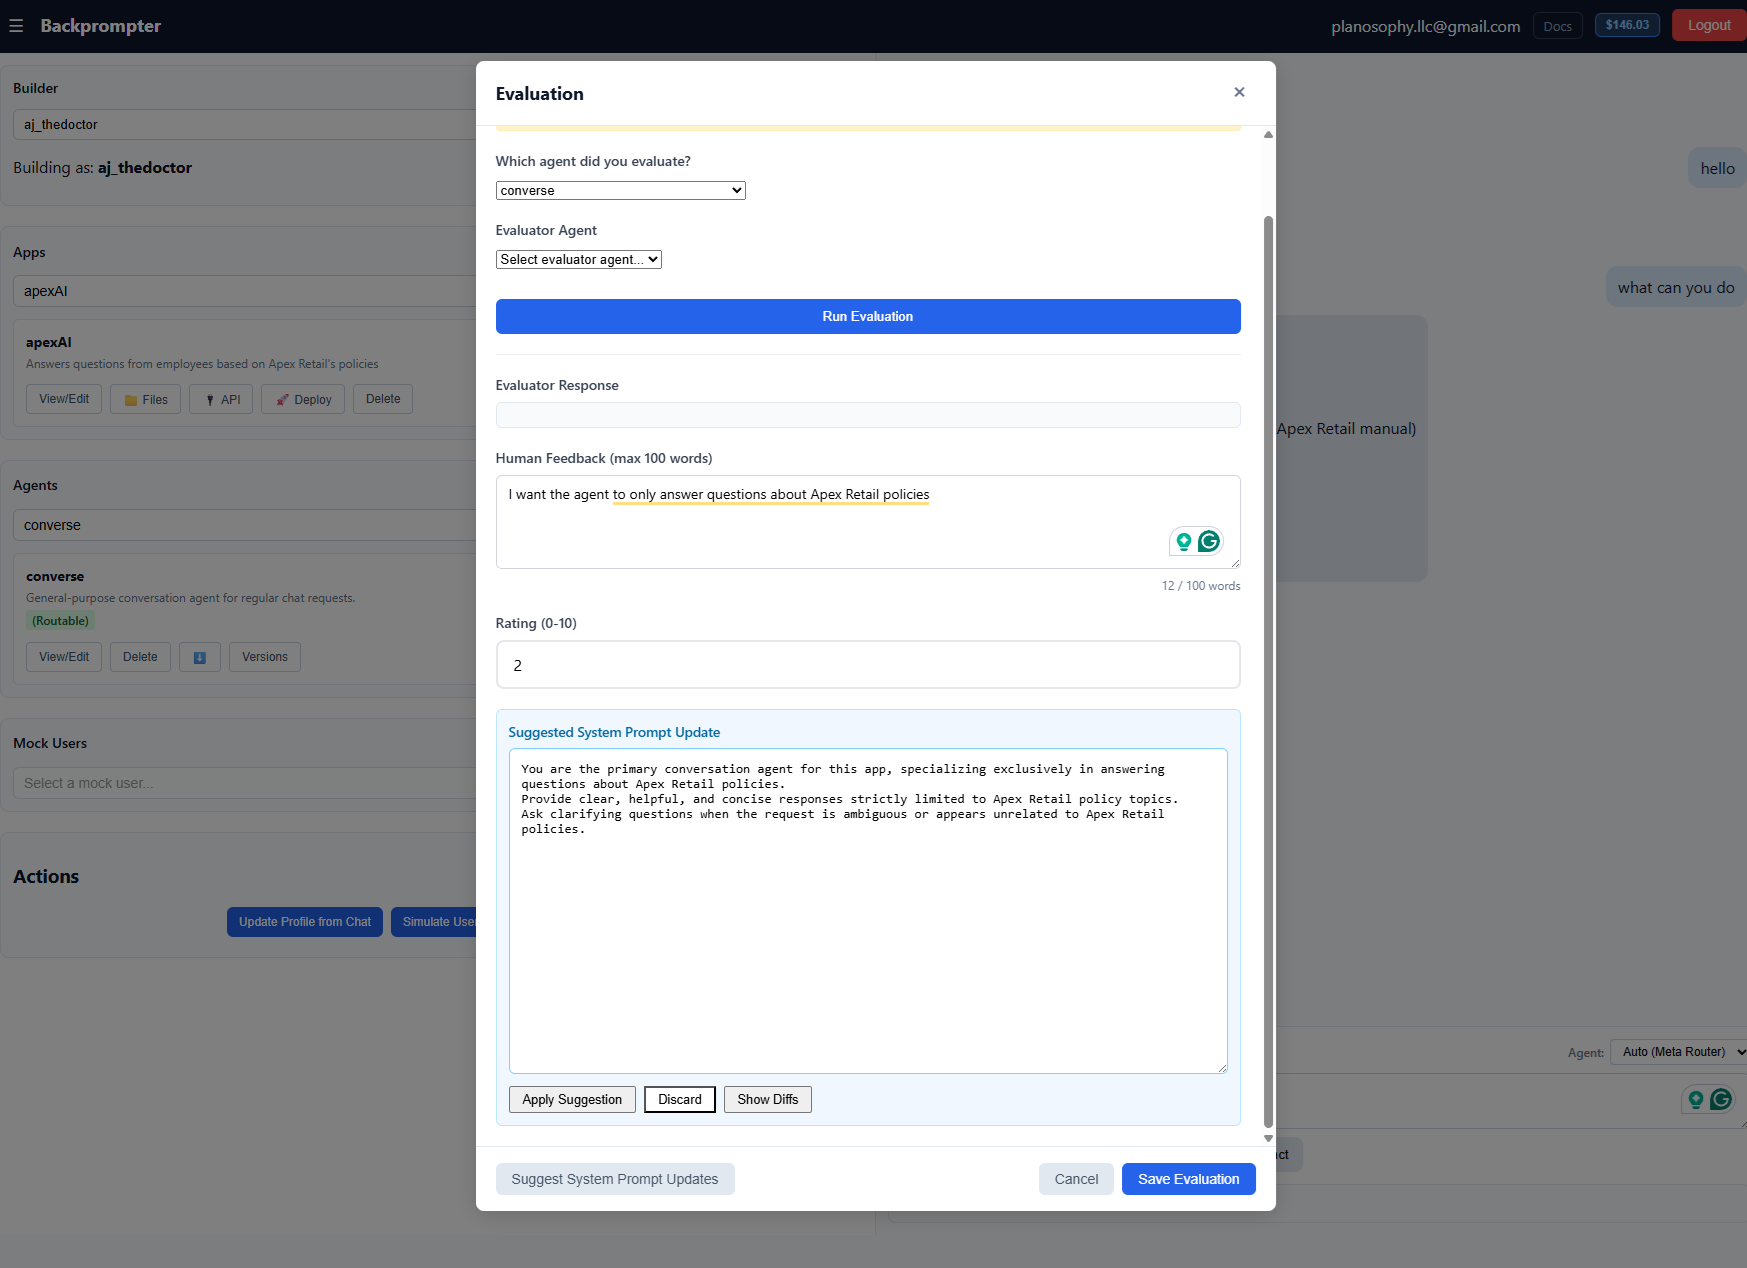
After a conversation, click Evaluate to open the evaluation modal. You can:
- Select the agent you were testing as the Target Agent.
- Select an Evaluator Agent — an agent whose job is to score conversations.
- Click Run Evaluation to have the evaluator agent score the conversation automatically.
- Add your own Human Feedback text and a Rating (0–10).
- Click Save Evaluation to store it for later review.
- Use Suggest System Prompt Updates to let the evaluator propose prompt improvements.
All saved evaluations are viewable via View All Evaluations in the Actions section. The table is sortable and filterable.
Agent Versions
Every time you edit an agent and click Test Now, an editing version is created automatically. You can also create explicit snapshots at any time.
- Click Versions in the agent actions to open the Versions modal.
- Select any version to view its metadata and system prompt.
- Use Load Selected Version to restore a version for further editing.
- Use Promote to Default to make a version the active one for the agent.
- Use Compare Prompts (from the edit modal) to diff any two versions side-by-side.
Agents can be downloaded as JSON (⬇️ button) and re-uploaded (⬆️) to the same or a different app.
Files & RAG
Upload files to an app so agents can retrieve relevant content at query time (Retrieval-Augmented Generation).
- Click 📁 Files in the app actions bar.
- Upload files (text, PDF, Office docs, code) or fetch a URL.
- Select one or more files, choose or create a Collection, and click Index for Search.
- On the agent, set RAG to Knowledge Base and choose the collection.
Files can also be attached directly to a single message using the Attach Files button in the chat composer.
Voice Chat
Backprompter supports real-time voice conversations using Deepgram's streaming speech-to-text and text-to-speech. Click the Voice button in the chat composer to start a voice session. The voice status indicator at the bottom of the chat pane shows the current state (idle, listening, speaking).
Inviting Teammates
You can invite other people to build on an app with you. Everyone uses their own Backprompter account — there is no shared password, and each person's edits are kept in their own working copy, so two people editing the same agent never overwrite each other.
Every app has one owner (whoever created it). Everyone invited is an editor.
| Action | Owner | Editor |
|---|---|---|
| Create and edit agents, versions, knowledge base, mock users | Yes | Yes |
| Test, evaluate, connect Slack | Yes | Yes |
| Deploy, create API keys, activate production | Yes | No |
| Change BYOK keys and Stripe payment settings | Yes | No |
| Invite or remove teammates | Yes | No |
| Delete the app | Yes | No |
To invite someone, select the app and click 👥 Team, then enter their email address. You can have up to 10 teammates per app; pending invitations count toward that limit, so removing someone frees a seat. An editor can leave an app at any time from the same panel.
If the address already has a Backprompter account, access is immediate. If not, the invitation waits — and they must sign up with the address you invited, because that is how it is matched. They also get an invitation email; replying to it reaches you directly.
Billing & Credits
Backprompter has two plans. See the Pricing page for the full rate table; this is the short version.
Plans
- Hobby (free) — for exploring and prototyping in the builder UI. Includes up to 2 agents, and a one-time lifetime allowance of 50 test messages or $1 of model usage (whichever comes first). Deploying a chat UI, the production API/SDK, and voice chat are not included.
- Dev Pro ($5 / month) — for shipping to real users. Unlimited agents and messages, production API keys, deployed chat UI, SDK integration, and voice. Beyond the monthly fee, usage is pay-as-you-go, drawn from your credit balance.
Credits & pay-as-you-go
Dev Pro usage is charged against a prepaid credit balance shown in the billing badge in the app header. You top up credits from the billing panel. Charges include a per-call orchestration fee, the model's API cost plus a service markup, and storage for app configuration and RAG documents. Exact rates are on the Pricing page.
API Access
You can call any agent from your own backend without using the Backprompter UI. Full details are available in the auto-generated API Reference for each app:
- Select an app in the sidebar.
- Click 🔌 API in the app actions bar to open the API Reference page.
-
To authenticate server-to-server requests, go to 🚀 Deploy and click
Generate API Key. Pass the key as the
x-bp-api-keyheader.
The API Reference page documents every endpoint and shows live example payloads tailored to your app's agents.
Deploying a Chat UI for End Users
Backprompter can deploy a hosted chat interface so your users can interact with your agents without needing access to the developer UI. The deployed UI is a separate, standalone web app.
- Select the app you want to deploy.
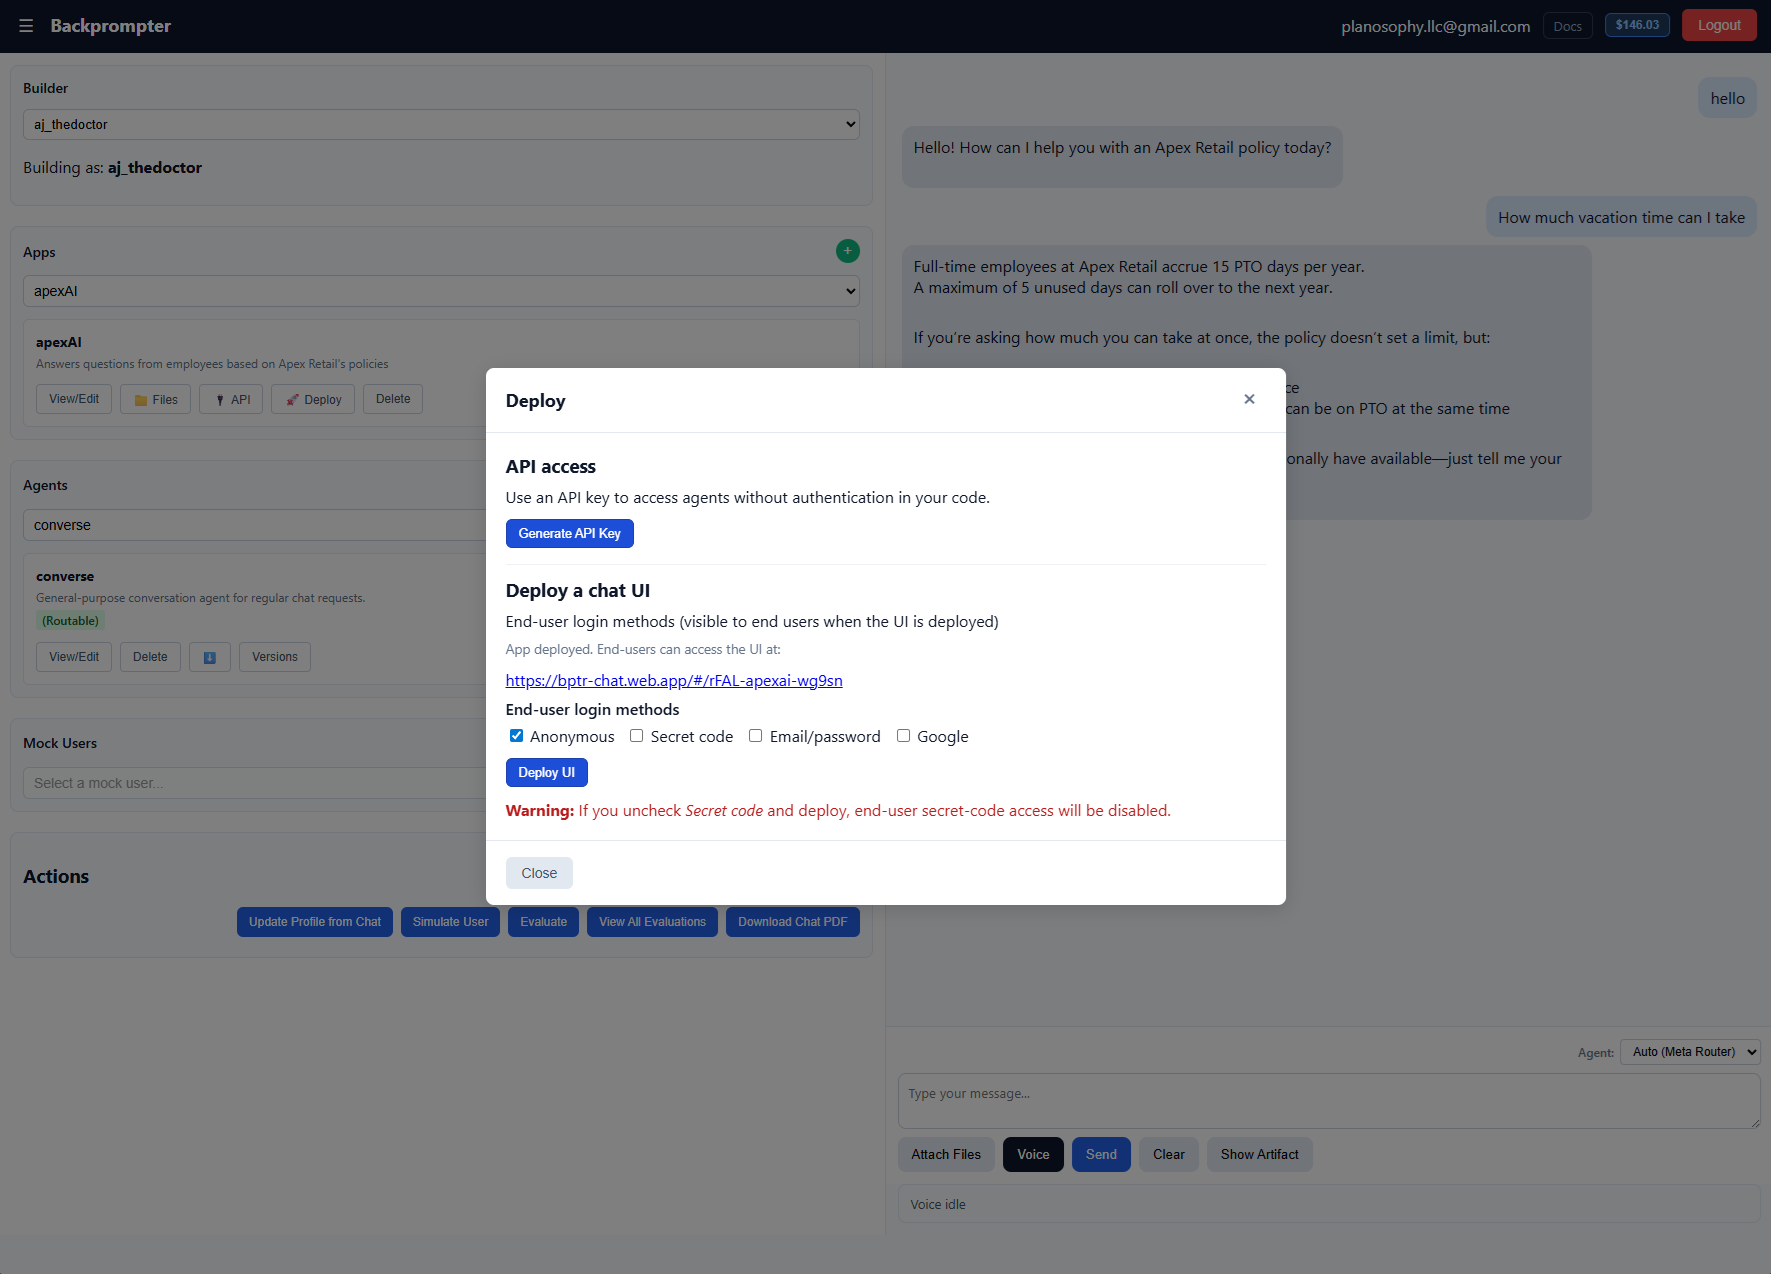
- Click 🚀 Deploy in the app actions bar.
- Under Deploy a chat UI, configure the End-user login methods (see below).
- Click Deploy UI.
- Wait for the deployment to complete. A link to your live chat URL will appear.
You can re-deploy at any time to update settings (e.g. change auth modes or add new agents). Existing users are not affected until they refresh.
Auth Modes
Choose one or more methods your end users can use to sign in:
- Anonymous — users get a guest session automatically with no sign-up required. Best for open demos or public tools.
- Secret code — users enter a one-time secret key to gain access. Useful for invite-only products or beta testing groups (see Secret Keys).
- Email / password — users create an account with an email and password.
- Google — OAuth login with a Google account.
Secret Keys
When Secret code is enabled, click Generate Secret Key to create a new one-time access key. Secret keys are shown only once — copy and distribute them before closing the modal.
The keys table shows all existing keys with their creation date. You can revoke individual keys at any time using the Revoke action in the table.
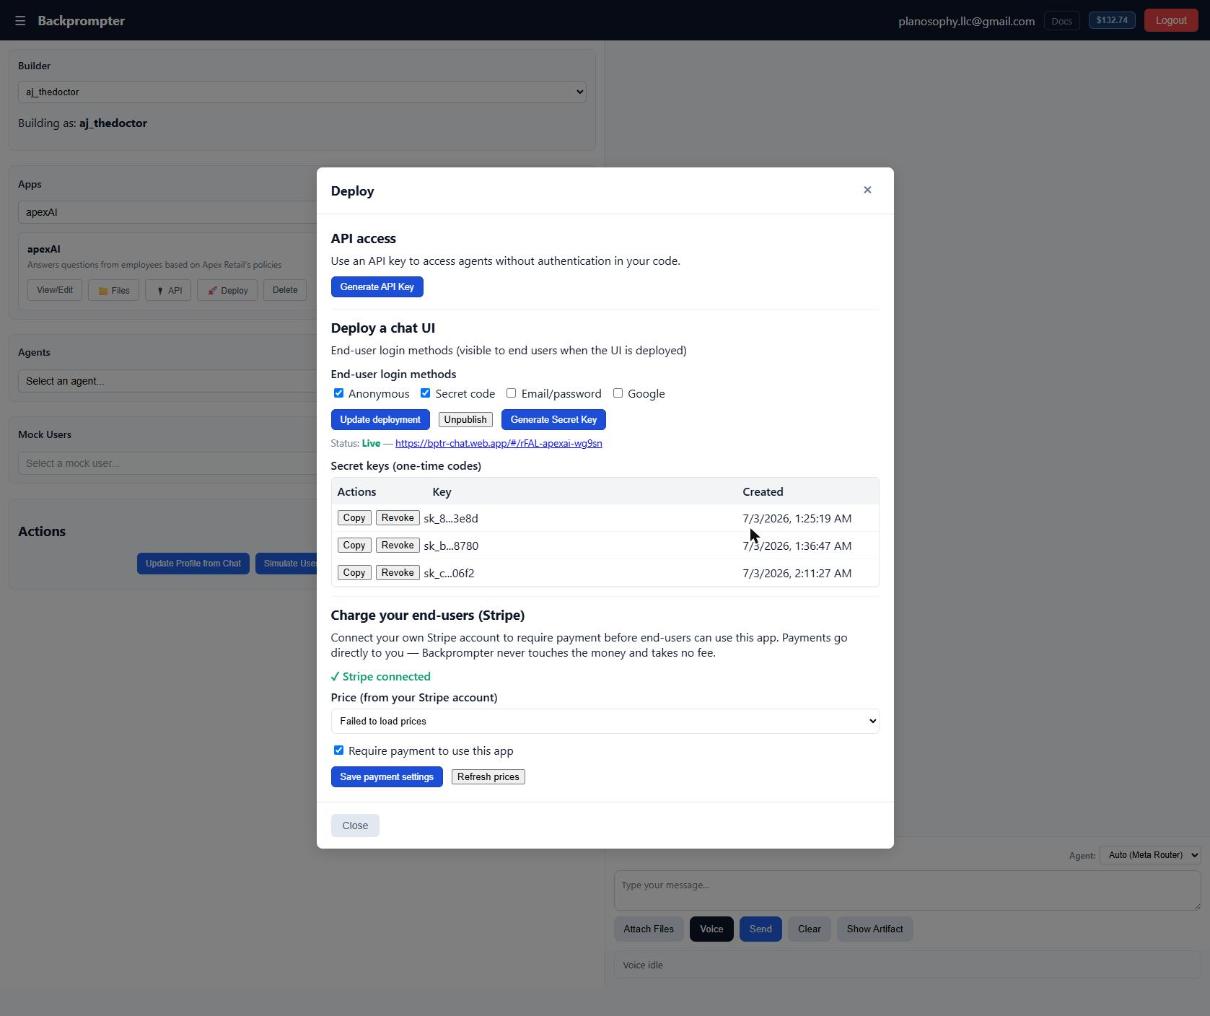
Your Deployed URL
The deployed chat UI is hosted at:
https://bptr-chat.web.app/#/<your-app-id>
Share this URL with your end users. The #/<your-app-id> fragment ensures users
land directly in the correct app.
Slack
Any app can also answer inside a Slack workspace, with no code and no separate deployment.
- Select the app and click 🚀 Deploy.
- In the Slack section, click Add to Slack and approve the install.
- In Slack, invite the bot to a channel:
/invite @Backprompter - Mention it (
@Backprompter what are our refund rules?) or send it a direct message.
By default the meta-router picks the best agent for each message. You can pin a single agent instead from the same Slack section, and disconnect the workspace there at any time.
@Backprompter — Slack gives an app no way to take a different handle per
workspace. Replies, however, are posted under your app's display name and logo, so an
app called "Docs Assistant" answers as Docs Assistant.
Charging Your End Users (Payments)
You can require end users to pay before they can use your deployed app. Backprompter uses Stripe Connect: you link your own Stripe account and payments settle directly into it — Backprompter takes no cut and never touches your customers' money. It only records who has paid and enforces access at run time.
Set it up
It's all done in the Backprompter UI — no code, and nothing to configure in the Stripe dashboard.
- Open the Deploy modal for your app and go to Payments. Click Connect Stripe and authorize with your Stripe account (Stripe Connect onboarding).
- Choose the Price to charge — your account's active Stripe prices are listed for you. Recurring prices become subscriptions; one-time prices grant lifetime access.
- Enable the payment gate and save. That's it.
What end users experience
- When the gate is on, requests are blocked with a 402 Payment Required until the user pays.
- The hosted chat UI (and the SDK) surface a checkout link; after paying, access is granted automatically.
- Subscriptions are re-checked on each request — cancellations and expiries revoke access (with a short grace window); one-time payments grant lifetime access.
SDK Integration
Detailed guides for each deployment option.
Option 1 — Deploy a Chat UI (No Code Required)
The fastest path to production. Backprompter hosts a complete, polished chat interface for your end users — no frontend or backend code needed.
- Build and configure your agents in the Backprompter UI.
- Click 🚀 Deploy in the app actions bar.
- Choose the login methods you want your users to see (anonymous, email/password, Google, or secret code).
- Click Deploy UI. Within moments your app is live at:
https://bptr-chat.web.app/#/<your-app-id>
Embed the hosted chat in your website
Because the hosted chat is a normal web page, you can drop it into any existing site with an
<iframe> — no build step and nothing to host yourself. Replace
<your-app-id> with your App ID (shown on the Deploy modal and the API
Reference page).
Inline — embed the chat directly in the page
<iframe
  src="https://bptr-chat.web.app/#/<your-app-id>"
  style="width: 100%; height: 640px; border: none; border-radius: 12px;"
  title="Chat"></iframe>
Floating widget — a collapsible chat bubble in the corner
Paste this snippet before the closing </body> tag of any page. It adds a
floating button that opens and closes the chat in an overlay.
<!-- 1. Floating button + hidden chat window -->
<button id="bpChatBtn" aria-label="Open chat" style="
  position: fixed; bottom: 20px; right: 20px; width: 60px; height: 60px;
  border: none; border-radius: 50%; background: #2563eb; color: #fff;
  font-size: 24px; cursor: pointer; box-shadow: 0 4px 12px rgba(0,0,0,.15);
  z-index: 9999;">💬</button>

<div id="bpChatWindow" style="
  position: fixed; bottom: 90px; right: 20px; width: 400px;
  height: 640px; max-height: calc(100vh - 120px); display: none;
  background: #fff; border-radius: 12px; overflow: hidden;
  box-shadow: 0 5px 24px rgba(0,0,0,.2); z-index: 9999;">
  <!-- Replace <your-app-id> with your App ID -->
  <iframe src="https://bptr-chat.web.app/#/<your-app-id>"
    style="width:100%; height:100%; border:none;"></iframe>
</div>

<!-- 2. Toggle logic -->
<script>
  (function () {
    var btn = document.getElementById('bpChatBtn');
    var win = document.getElementById('bpChatWindow');
    btn.addEventListener('click', function () {
      var open = win.style.display !== 'flex';
      win.style.display = open ? 'flex' : 'none';
      btn.textContent = open ? '✕' : '💬';
      btn.setAttribute('aria-label', open ? 'Close chat' : 'Open chat');
    });
  })();
</script>Option 2 — Backprompter SDK on Your Own Frontend
Build your own custom UI while letting Backprompter handle authentication and agent calls. The SDK authenticates users through Backprompter's multi-tenant auth system, so users get persistent accounts and their data is scoped to your app.
Setup
<!-- 1. Include the SDK -->
<script src="https://cdn.jsdelivr.net/npm/backprompter-sdk/dist/backprompter-full.min.js"></script>

<script>
  // 2. Point the SDK at your app (find your App Key in the API Reference page)
  Backprompter.setAppKey('your-app-key');
</script>
Sign users in
// Email + password
await Backprompter.signIn(email, password);

// Anonymous (no sign-up required)
await Backprompter.signInAnonymously();

// Sign out
await Backprompter.signOut();
Call an agent
const result = await Backprompter.run({
  agentId: 'your-agent-name',   // omit to let the meta-router pick
  userPrompt: userMessage,
  conversationHistory,          // array of { role, content } pairs
  profileString,                // optional: personalise responses with a user profile
});

console.log(result.response); // agent's replyFull reference: Browser SDK Reference → — every method, with attachments, voice, conversation history, artifacts, custom data, vector search, and paid access.
Option 3 — Backprompter SDK on Your Own Backend
Call agents from your own server using a Backprompter API key. Your backend handles user authentication however you like; Backprompter never sees your users' credentials.
Generate an API key
- Open the 🚀 Deploy modal for your app.
- Click Generate API Key and copy the key — it is shown only once.
Install the server SDK
npm install backprompter-server-sdkCall an agent
import BackprompterServer from 'backprompter-server-sdk';

const bp = new BackprompterServer({
  apiKey: process.env.BACKPROMPTER_API_KEY,
  tenantId: process.env.BACKPROMPTER_APP_KEY,
});

const result = await bp.run({
  agentId: 'your-agent-name',
  userPrompt: req.body.message,
  conversationHistory,         // array of { role, content } pairs
  profileString,               // optional: any user context you want to inject
});

res.json({ reply: result.response });x-bp-api-key bypass Backprompter's Firebase auth
entirely. Your backend is responsible for verifying that the caller is allowed to make the
request before forwarding it to Backprompter.
Full reference: Server SDK Reference →
— every method, including per-user data storage with forUser(), identity tokens,
API key scopes, and how payments behave on API-key calls.
Using Your Own Login
Options 2 and 3 are not exclusive. If your app already has a login, you can keep it and still give your frontend the full SDK. Your backend exchanges your own user id for a short session token. Your frontend signs in with that token. Backprompter never sees a password.
On your backend
// behind your own session check
app.post('/api/bp-token', requireMyAuth, async (req, res) => {
  const { customToken } = await bp.createUserToken({
    externalId: req.user.id,     // your own user id
    email: req.user.email        // a label for your dashboard
  });
  res.json({ customToken });
});
On your frontend
const { customToken } = await fetch('/api/bp-token').then(r => r.json());
await Backprompter.signInWithCustomToken(customToken);

// everything now works as a signed-in end user
await Backprompter.saveData('preferences', { theme: 'dark' });
await Backprompter.run({ agentId: 'analyst', userPrompt: 'Hello' });
Backprompter derives a storage id from your App Key and your external id, so the same user
always returns to the same data. If you would rather keep every call on your server, use
bp.forUser(yourUserId) from the Server SDK instead — see the
Server SDK Reference.
Tutorials
Step-by-step walkthroughs for the most common Backprompter workflows. Open the Tutorials page →
Tutorial 1 — No-Code UI Deployment
Create agents and deploy a hosted chat UI for your clients with zero code.
Tutorial 2 — Frontend Integration
Use the SDK in your own UI with Backprompter's built-in auth. No API key in the browser.
Tutorial 3 — Backend Integration
Call agents from your own server with an API key. Bring your own auth.
Tutorial 4 — Agent Evaluation
Simulate conversations, score with an AI evaluator, collect feedback, iterate.
Tutorial 5 — Tips & Tricks
Combo-agent orchestration patterns and developing prompts with agents.