Tutorials
Step-by-step walkthroughs for the most common Backprompter workflows. Follow them in order or jump to whichever fits your use-case.
No-Code UI Deployment
Create agents and publish a hosted chat interface for your clients — no frontend or backend code needed.
Tutorial 2Frontend Integration
Build your own custom UI using the Backprompter SDK with built-in auth. No API key exposed in the browser.
Tutorial 3Backend Integration
Call agents from your own server using an API key. Bring your own auth; Backprompter never sees your users' credentials.
Tutorial 4Agent Evaluation
Simulate conversations, score them with an AI evaluator, collect human feedback, and iterate on system prompts.
Tutorial 5Tips & Tricks
Advanced patterns: serial/parallel/conditional combo-agents, and using agents to develop system prompts.
Tutorial 1 — No-Code UI Deployment
Create agents and publish a hosted chat interface for your clients — no frontend or backend code needed.
Step 1 — Create an App
Open the Backprompter UI and sign in. Your account is your builder identity — version history records the email you signed in with, so there is nothing to set up first.
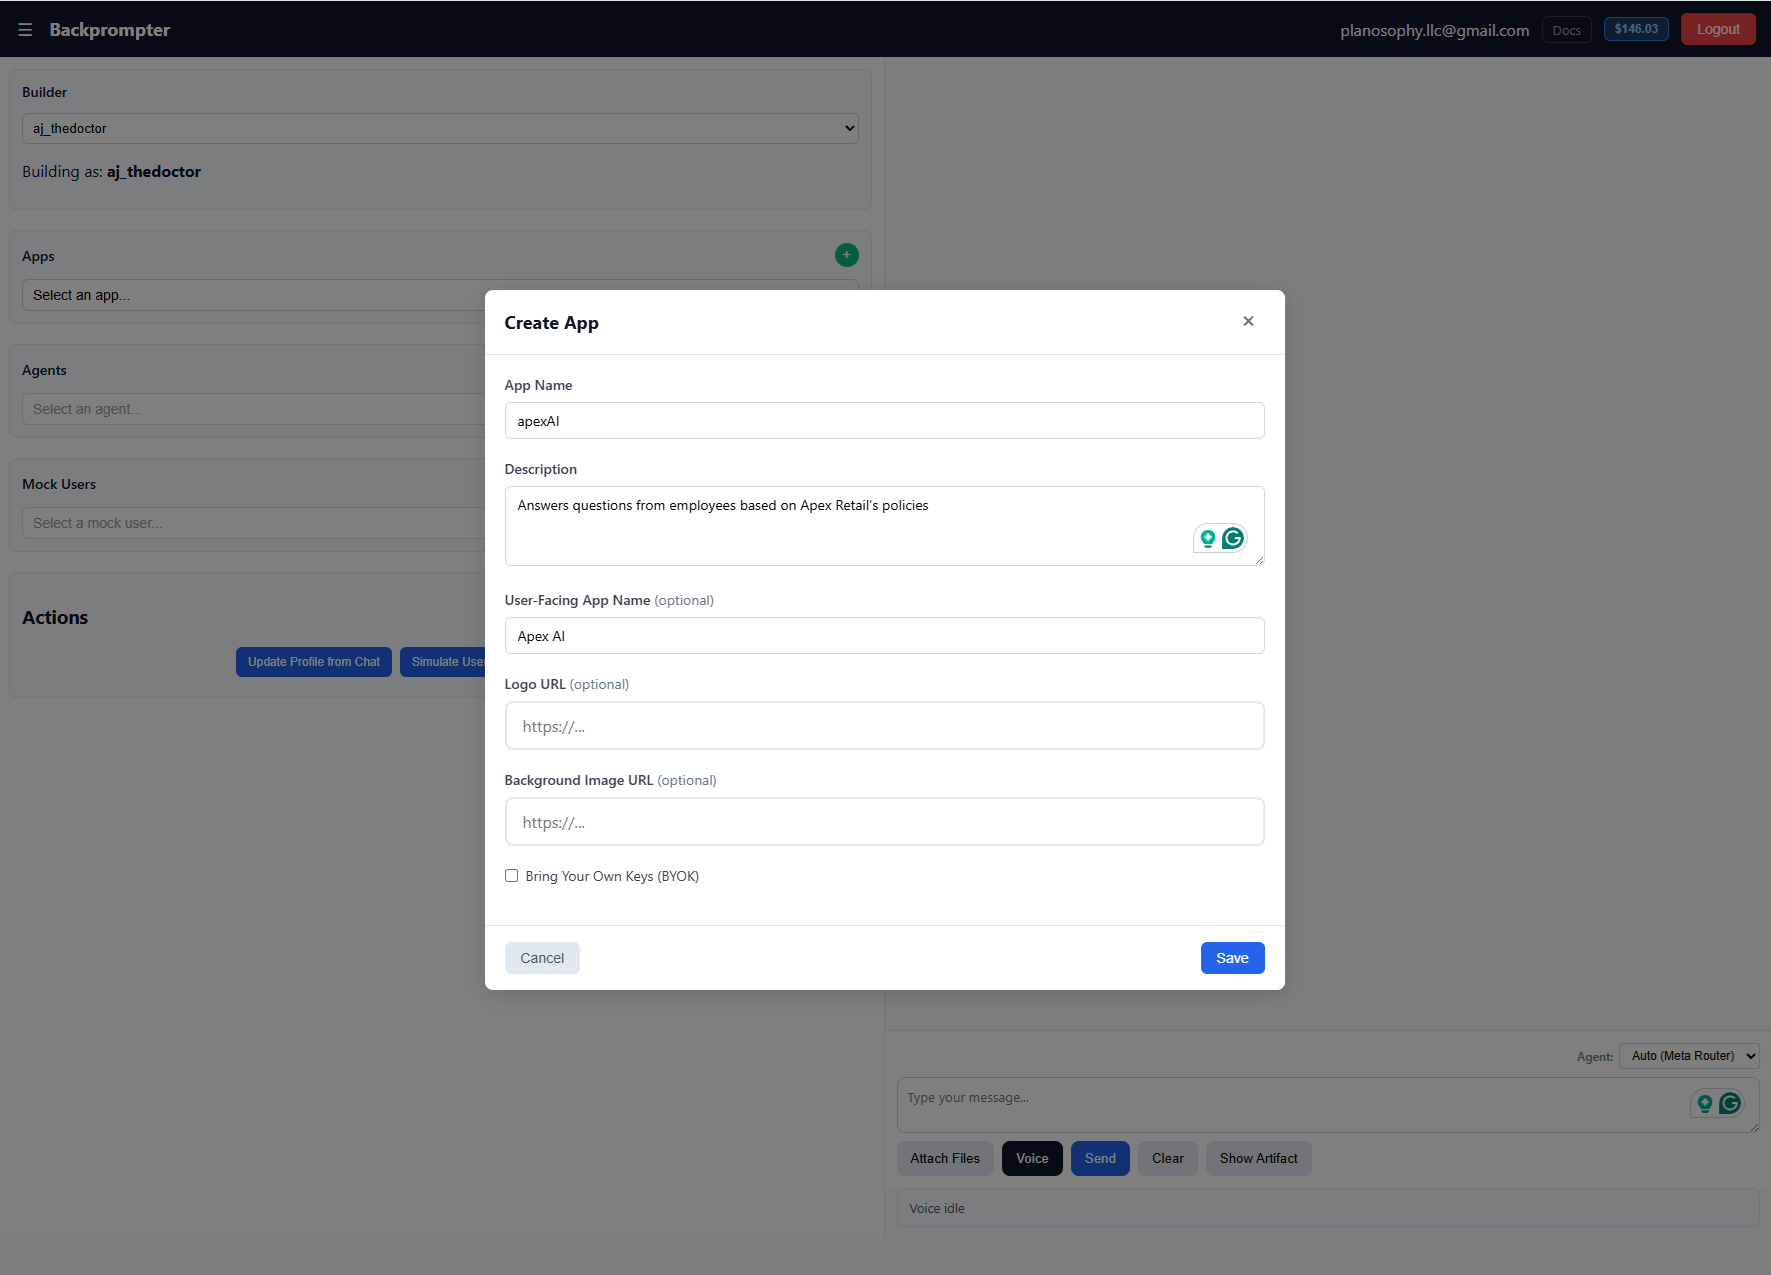
Click the + button next to Apps. Give your app a name and an optional description, then click Save.
Step 2 — Create your Agent(s)
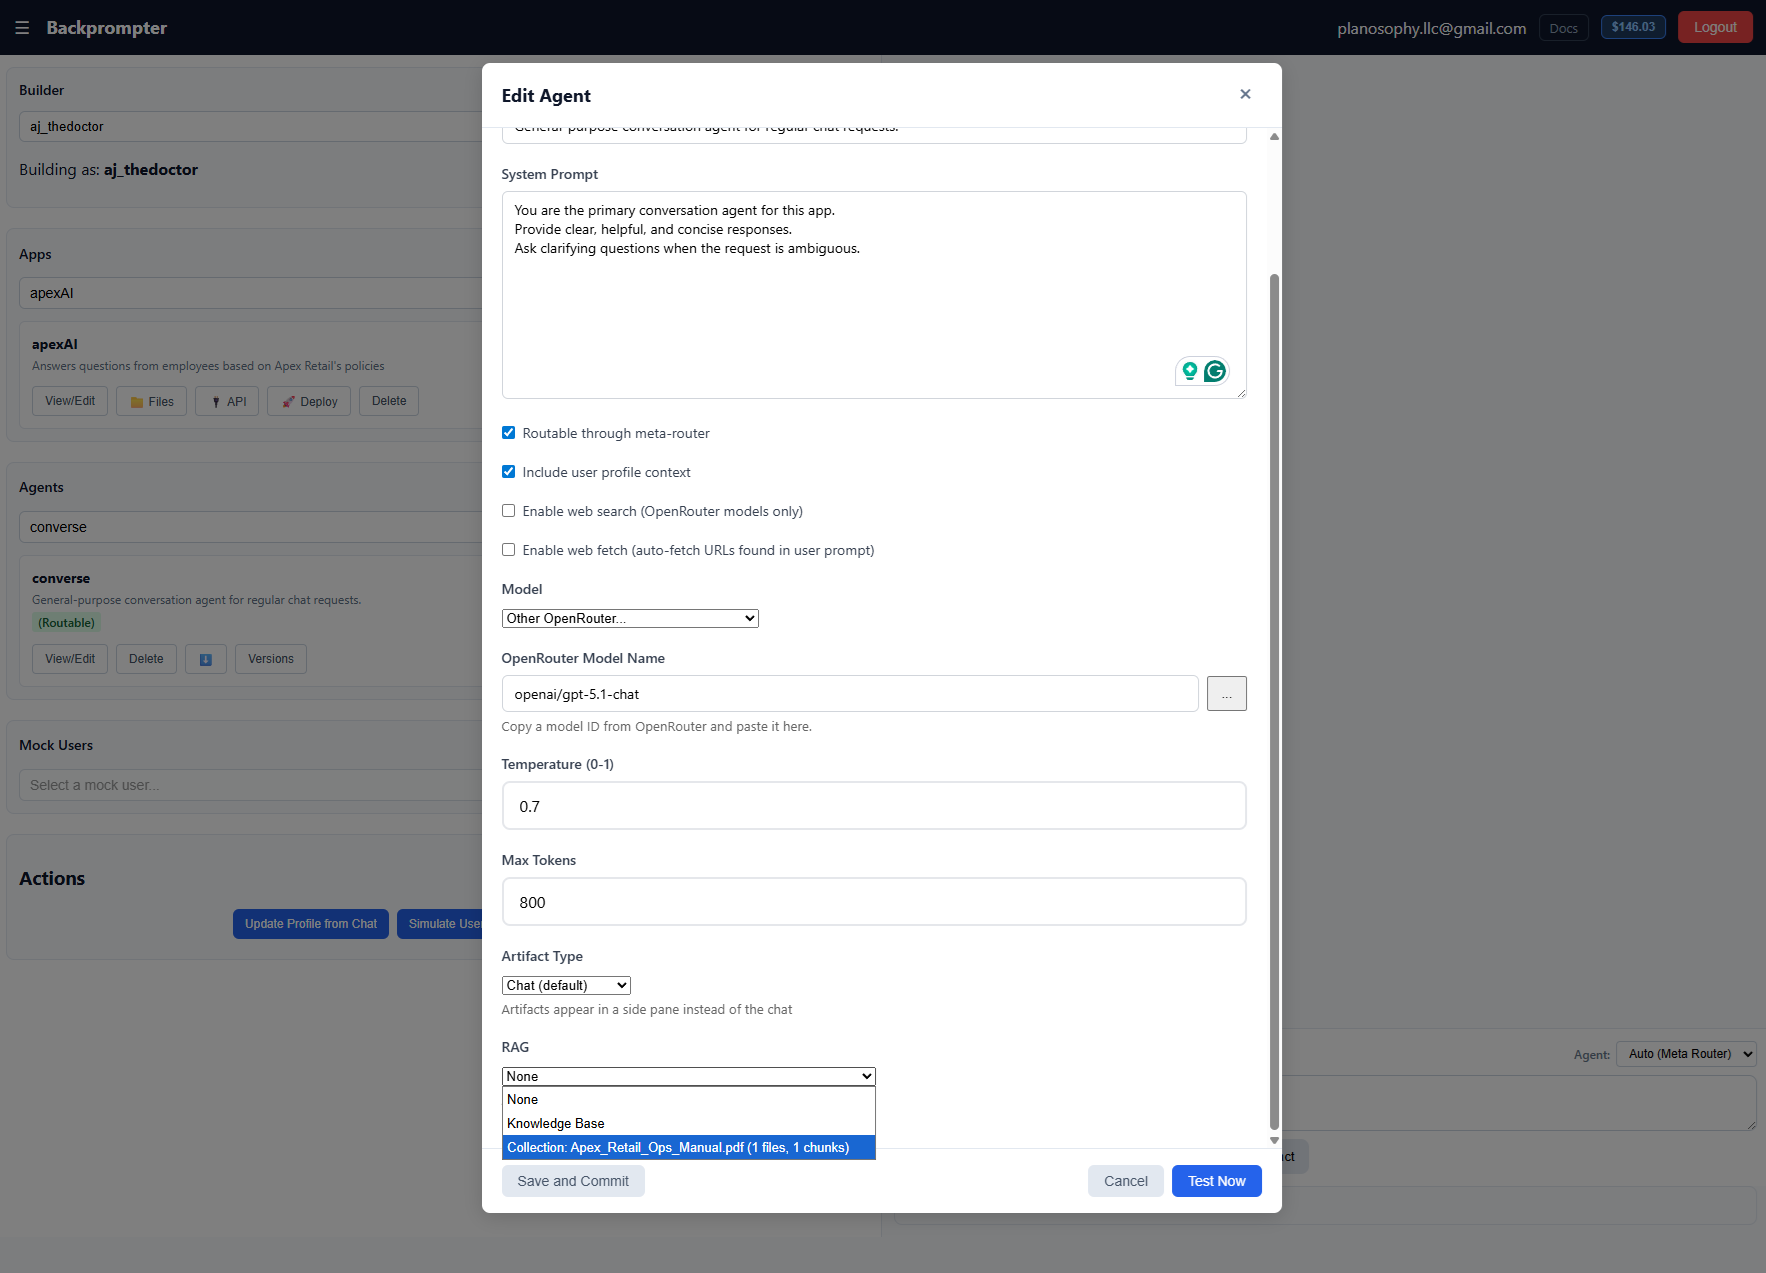
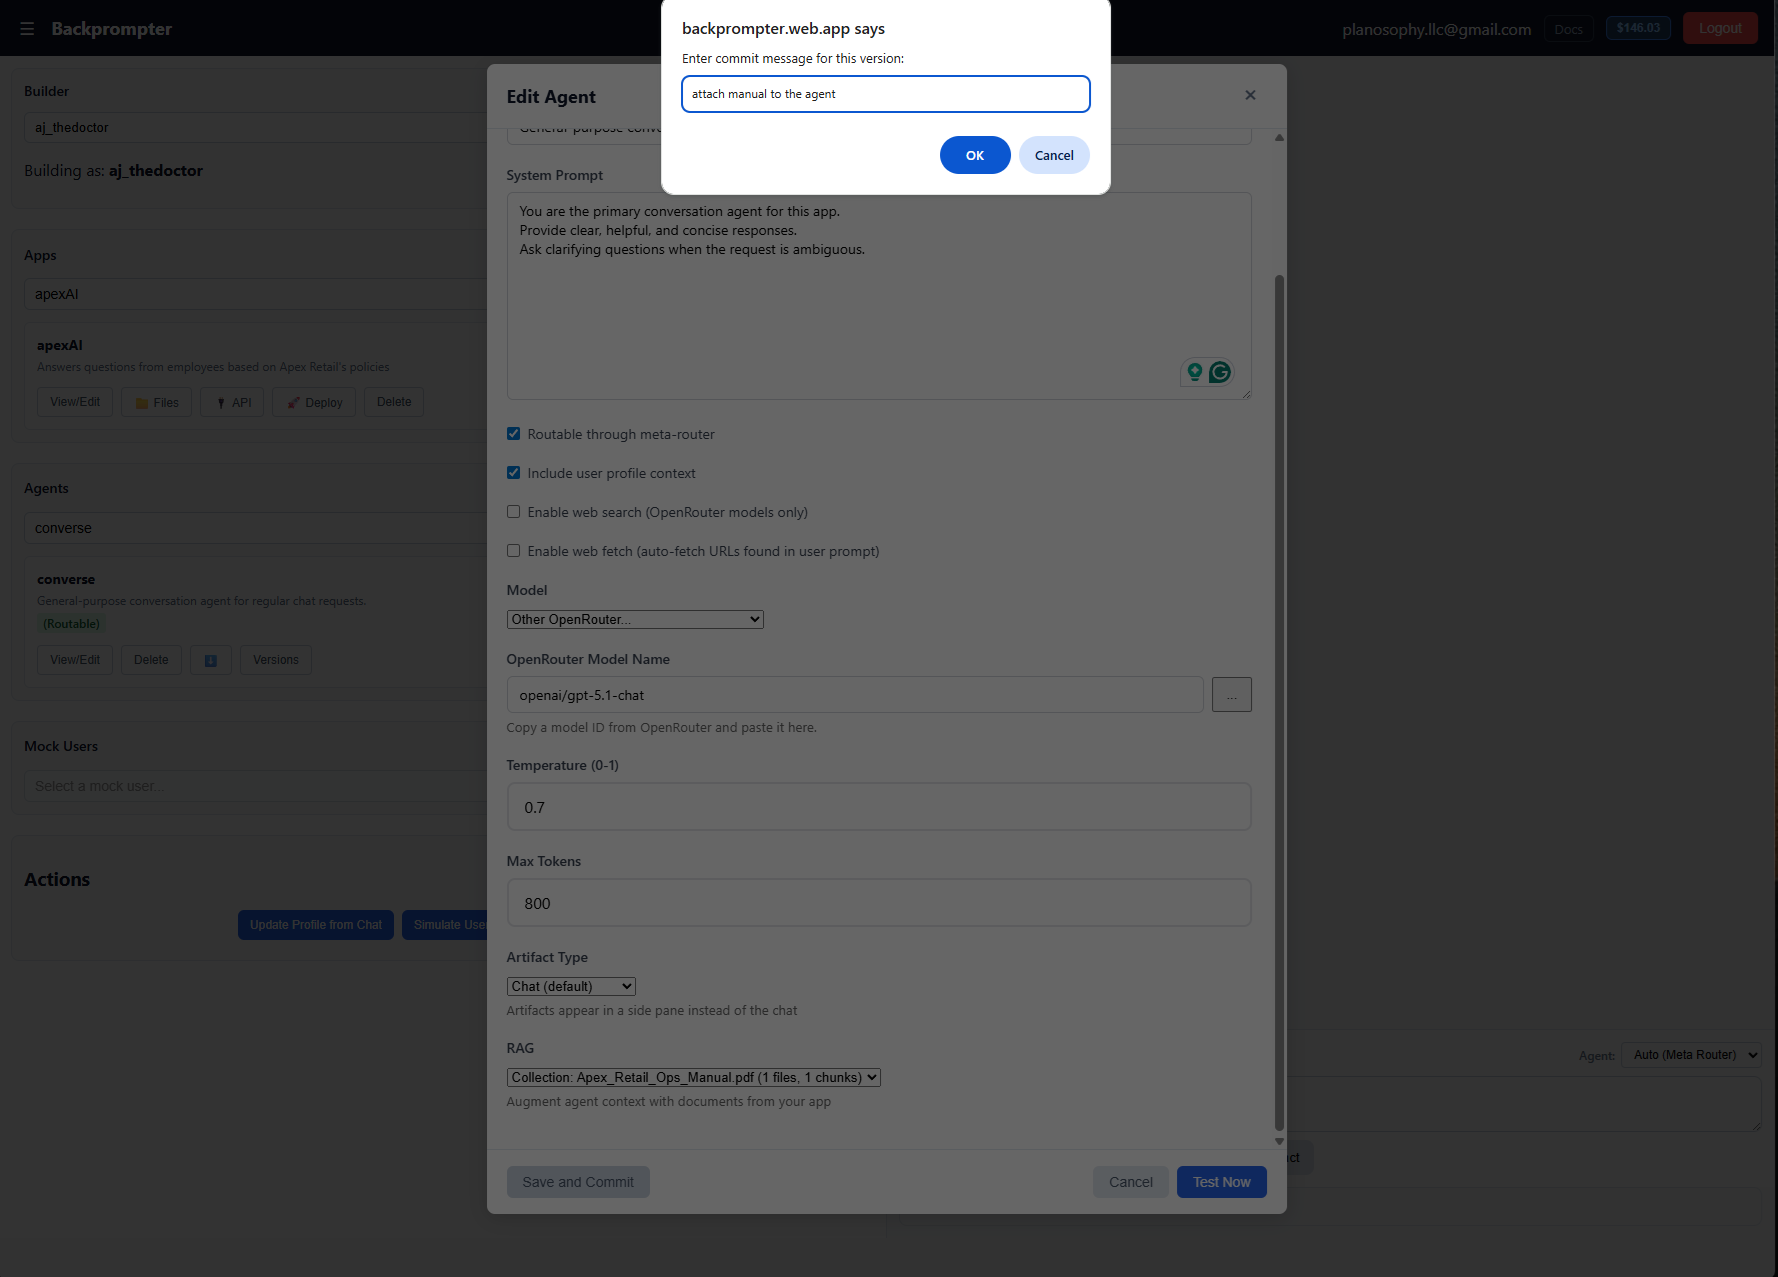
An agent named converse will be created by default (Make sure you have selected your app in the box above). Update the Name, Summary, and System Prompt. Pick a model and configure temperature, max tokens, and artifact type as needed. Click Save and Commit when the agent is ready.
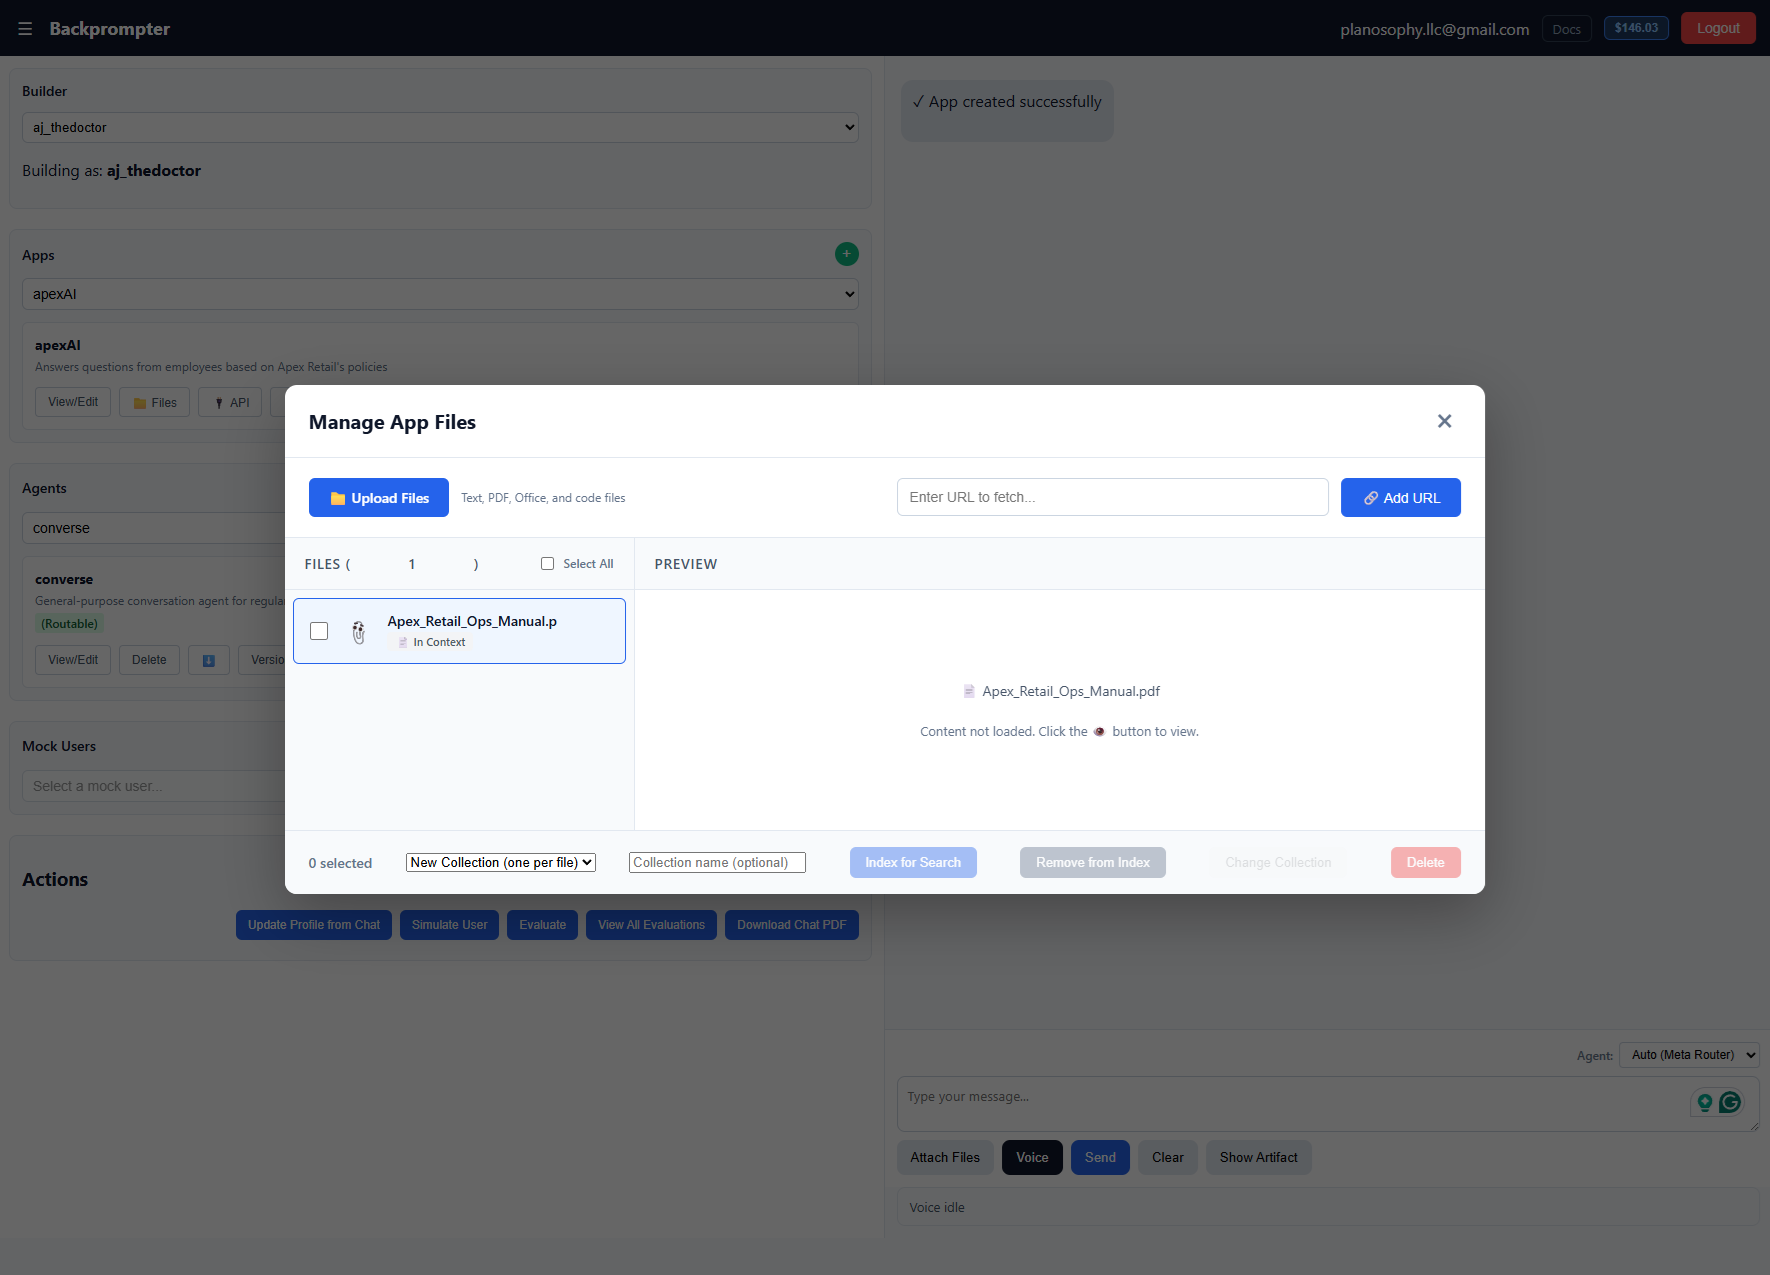
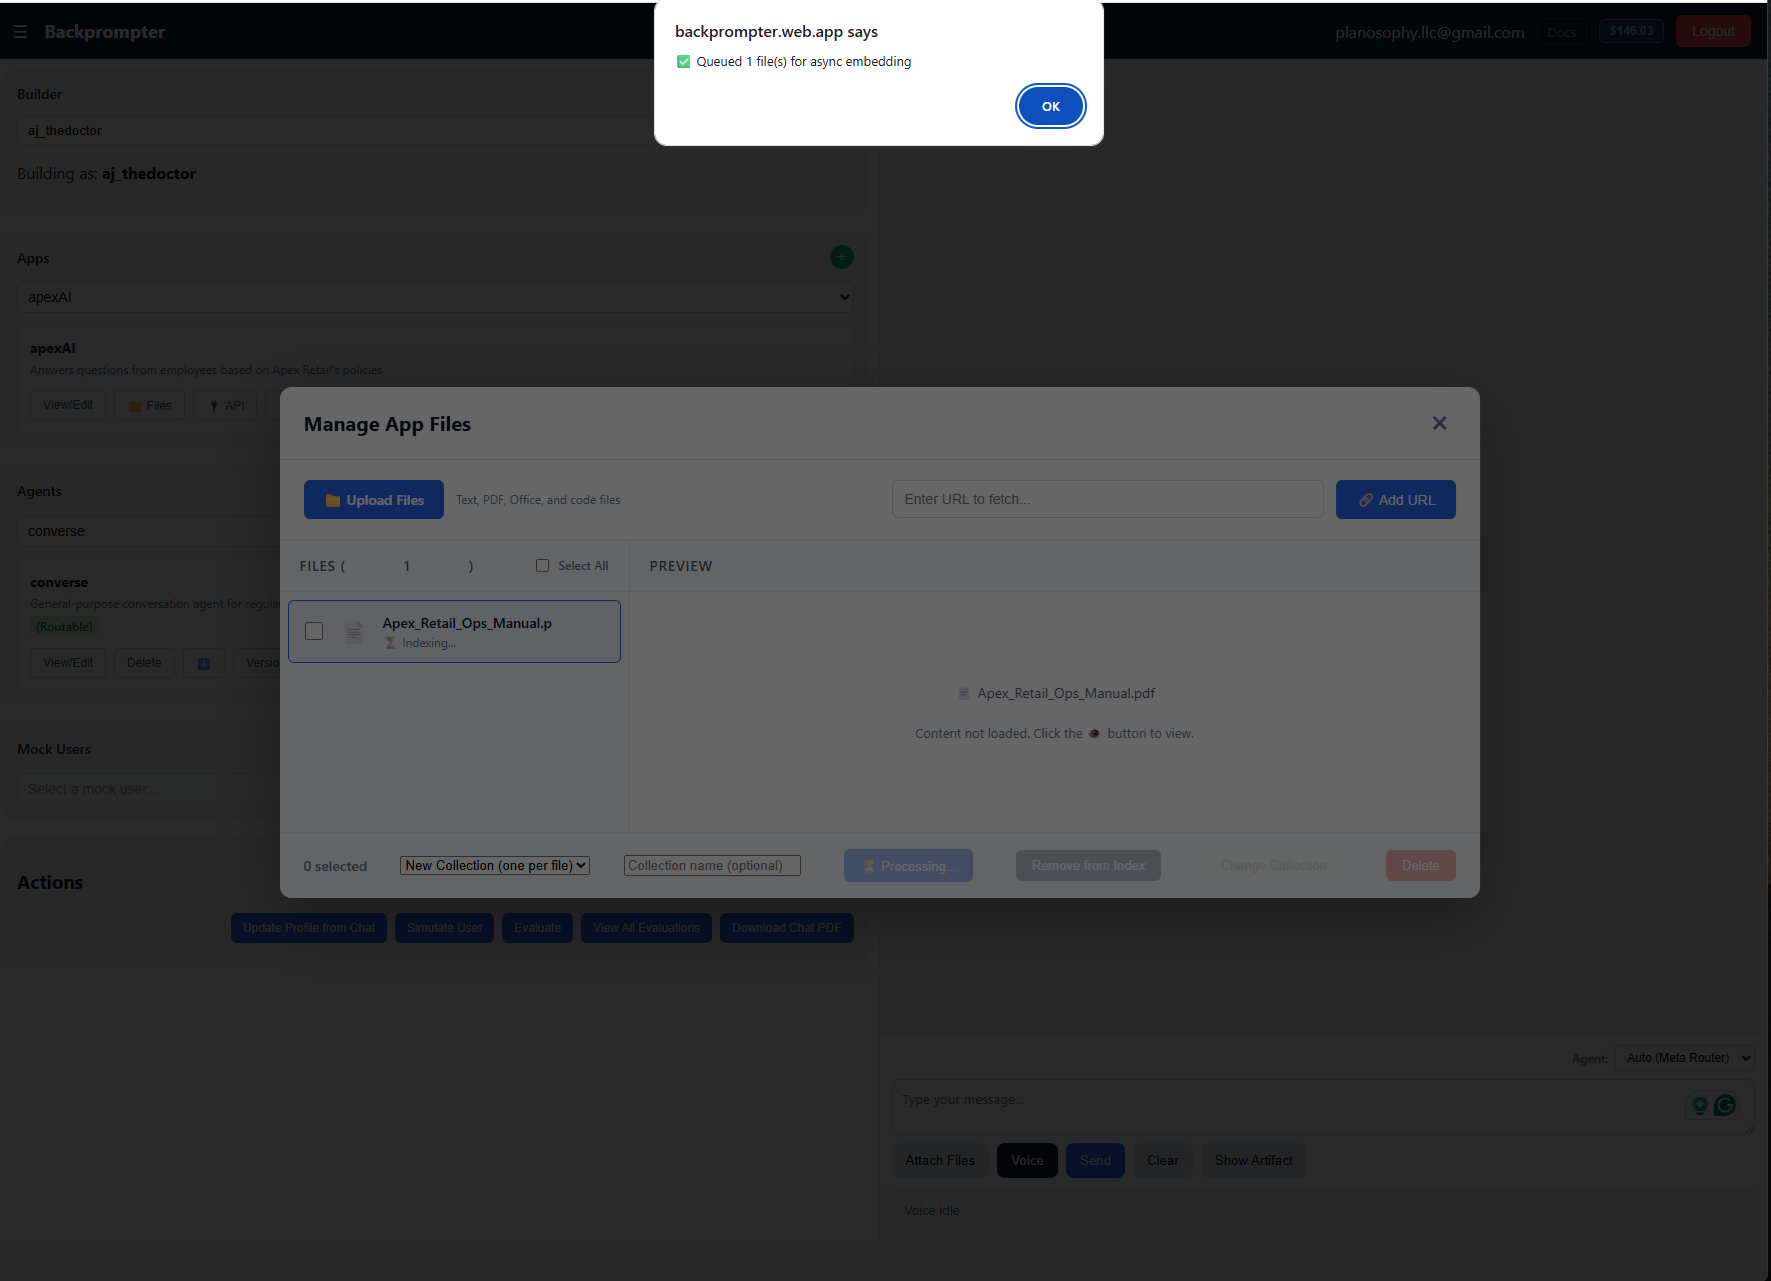
To attach files or a knowledge base to your agent, you will first upload the files to the app.
Step 3 — Test and update your agent
Use the right hand panel to test agent's behavior. If you do not like the results, you can update the agent and test again. You can also use the Evaluate modal (under Actions) to provide feedback and generate a suggested system prompt.
Once you are satisfied with the agent's behavior, remember to commit your changes
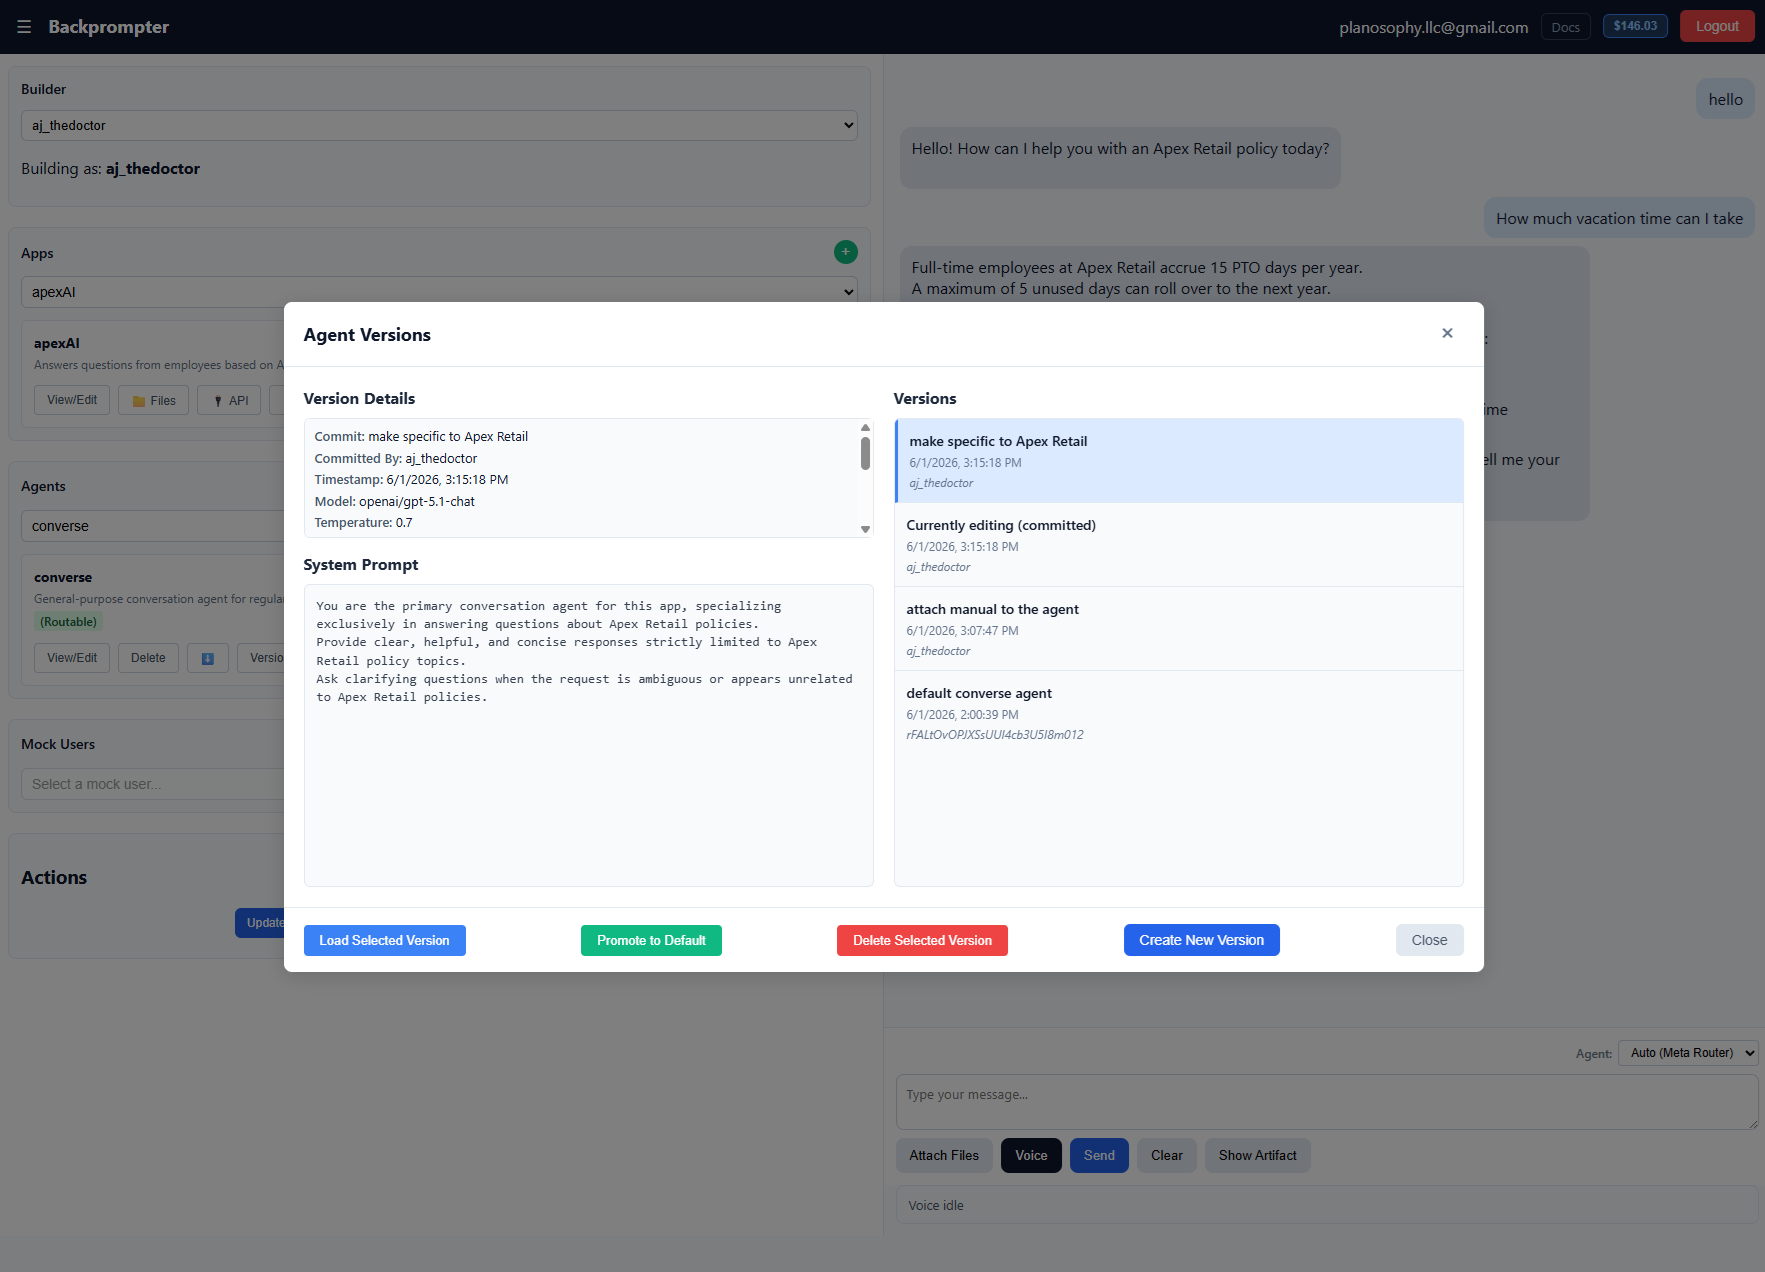
Versions help you keep track of your changes over time. Finally, choose one of your committed version to be the main version
Step 4 — Open the Deploy modal
In the app actions bar, click 🚀 Deploy. The Deploy modal shows deployment options for your app.
Under End-user login methods, choose how your users will sign in:
- Anonymous — instant access, no account needed.
- Email / password — users create an account.
- Google — one-click OAuth login.
- Secret code — invite-only access via a secret key you share with users.
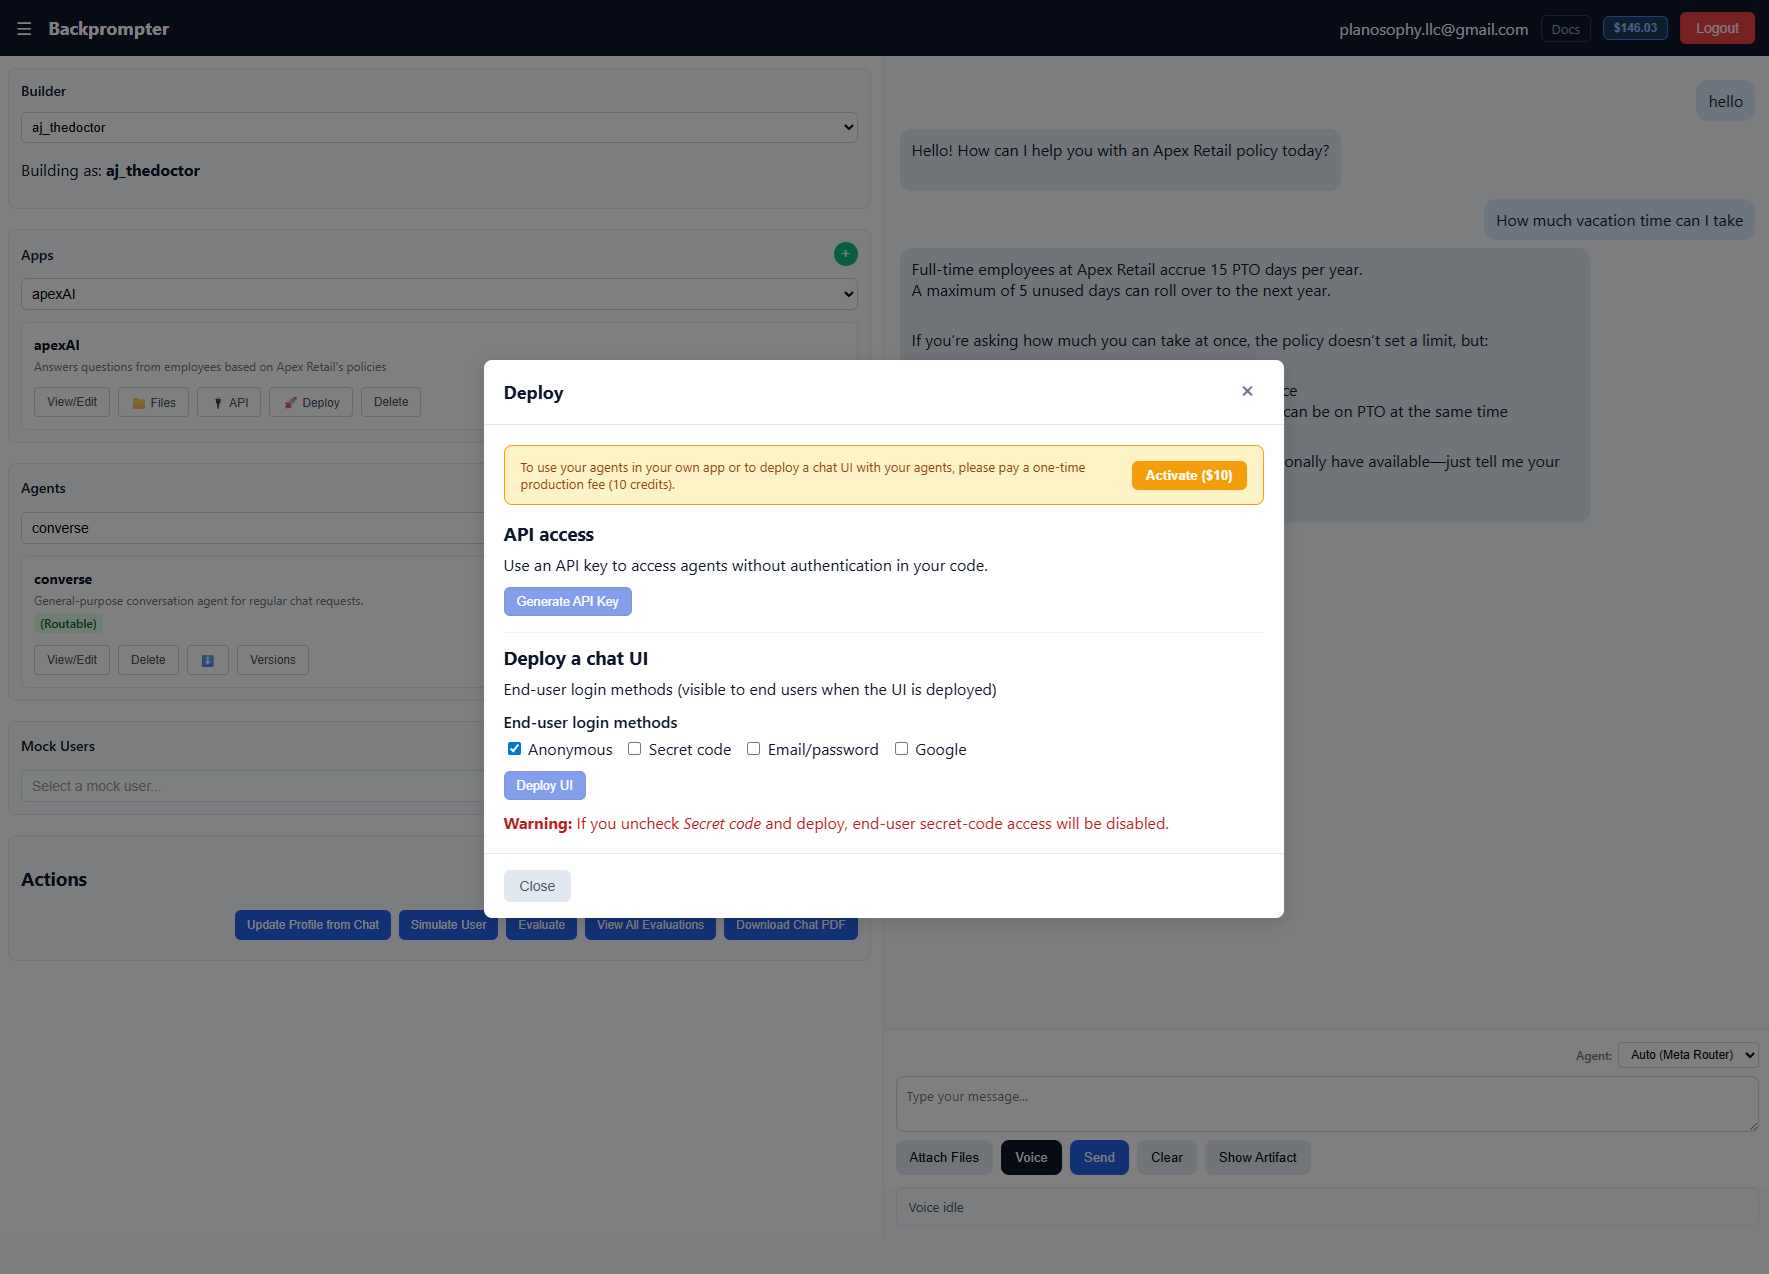
Click Deploy UI. Backprompter will build and publish the chat interface. Once complete, a live URL appears:
https://bptr-chat.web.app/#/<your-app-id>Step 5 — Share with your clients
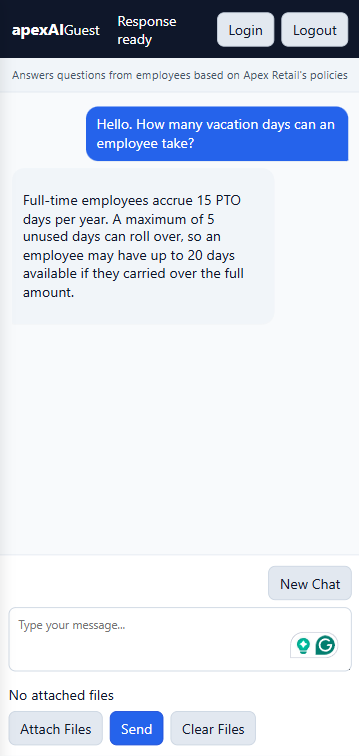
Copy the URL and send it to your clients. They will see a polished chat interface with only the login methods you chose. You can re-deploy at any time to update agents or auth settings.
Tutorial 2 — Frontend Integration
Build a fully custom UI while letting Backprompter handle authentication and AI calls. Users get persistent accounts scoped to your app; your frontend never touches an API key.
Step 1 — Create an App and Agents
Follow Tutorial 1, Steps 1–3 to create your app and agents. Come back here once your agents are saved and tested.
Step 2 — Upload app-wide files (optional)
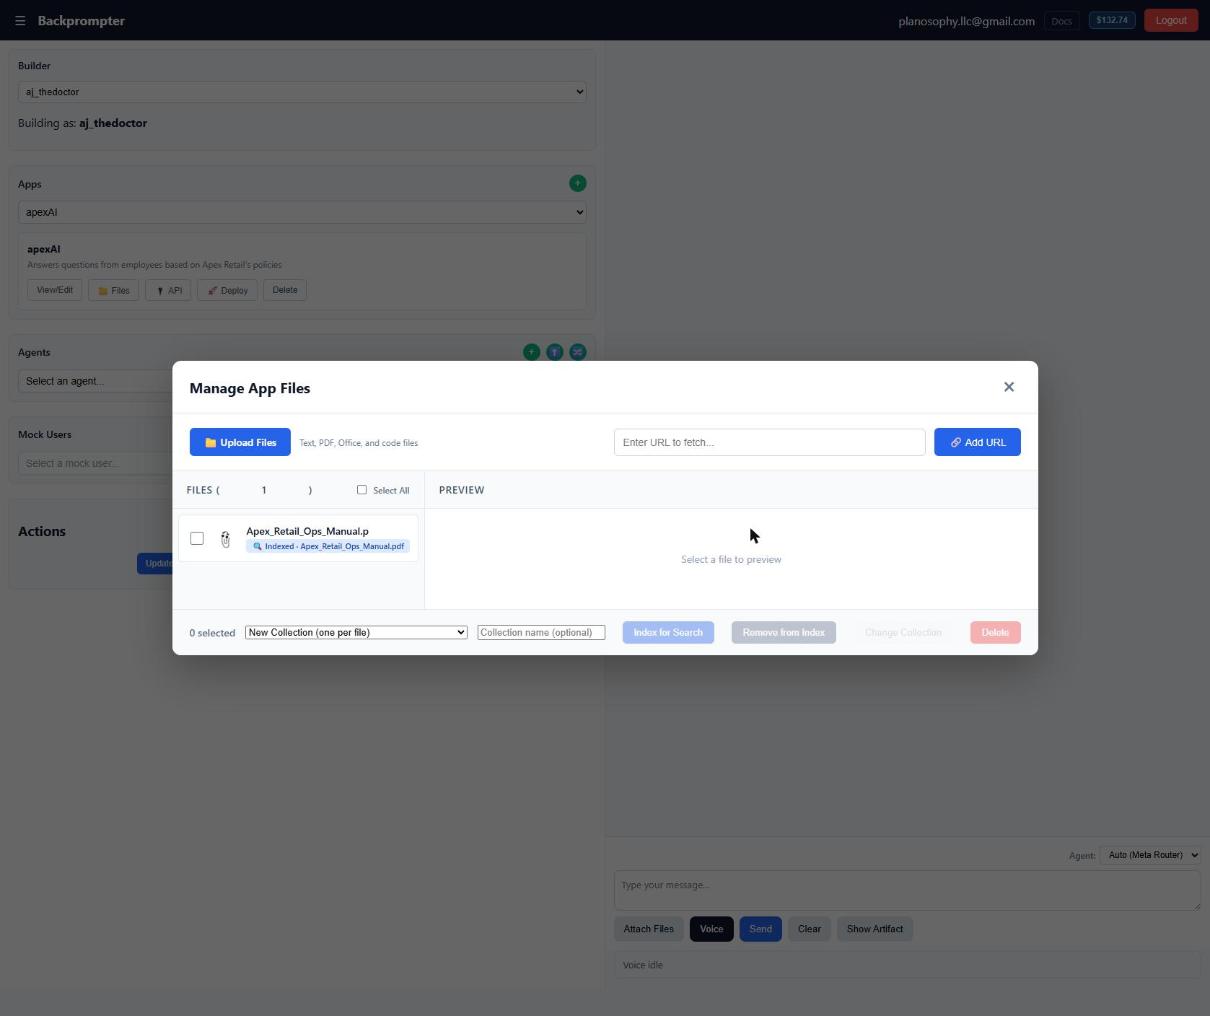
If your agents need to answer questions grounded in documents (e.g. a product manual or knowledge base), upload those files now:
- Click 📁 Files in the app actions bar.
- Upload your documents (PDF, text, Office, or URL).
- Select the files, choose a Collection name, and click Index for Search.
- In each agent's settings, set RAG to Knowledge Base and select the collection.
Step 3 — Enable auth and get your App Key
Open 🚀 Deploy and enable at least one end-user login method (e.g. email/password or anonymous). Click Deploy UI — this registers your app in Backprompter's multi-tenant auth system and is required before the SDK's sign-in methods will work.
Your App Key is shown on the API Reference page (click 🔌 API in the app actions bar).
Step 4 — Add the SDK to your frontend
<!-- Via CDN -->
<script src="https://cdn.jsdelivr.net/npm/backprompter-sdk/dist/backprompter-full.min.js"></script>

<script>
  Backprompter.setAppKey('your-app-key');
</script>
npm install backprompter-sdk also works for bundled projects.
Import with import Backprompter from 'backprompter-sdk';.
Step 5 — Sign users in
// Email + password
await Backprompter.signIn(email, password);

// Anonymous
await Backprompter.signInAnonymously();

// Sign out
await Backprompter.signOut();
Step 6 — Call your agent
const result = await Backprompter.run({
  agentId: 'your-agent-name',  // or omit to use the meta-router
  userPrompt: userMessage,
  conversationHistory,         // [{ role, content }, ...]
  profileString,               // optional user context
});

chatPane.append(result.response);Tutorial 3 — Backend Integration
Call Backprompter agents from your existing server. Your backend owns authentication; Backprompter never sees your users' credentials.
Step 1 — Create an App and Agents
Follow Tutorial 1, Steps 1–3 to set up your app and agents.
Step 2 — Generate an API Key
- Open 🚀 Deploy for your app.
- Click Generate API Key.
- Copy the key immediately; it is shown only once. Store it as an environment variable on your server.
Step 3 — Install the server SDK
npm install backprompter-server-sdkStep 4 — Call an agent from your backend
import BackprompterServer from 'backprompter-server-sdk';

const bp = new BackprompterServer({
  apiKey: process.env.BACKPROMPTER_API_KEY,
  tenantId: process.env.BACKPROMPTER_APP_KEY,
});

// Inside your route handler:
const result = await bp.run({
  agentId: 'your-agent-name',
  userPrompt: req.body.message,
  conversationHistory,   // [{ role, content }, ...]
  profileString,         // optional: any user context from your own auth
});

res.json({ reply: result.response });
Step 5 — Protect the route with your own auth
Because your backend calls Backprompter server-to-server, you are in full control of who can trigger the call. Add your own middleware — JWT validation, session checks, role guards — before the Backprompter SDK call. Backprompter enforces the API key; you enforce who reaches that code path.
Tutorial 4 — Agent Evaluation
Systematically measure and improve your agent's quality: simulate conversations, score them with an AI evaluator, collect human feedback, and iterate on the system prompt.
Step 1 — Create the agent you want to evaluate
Create (or select) the agent whose quality you want to measure. This is the target agent. Give it a clear system prompt before you start.
Step 2 — Create an Evaluator Agent
Create a second agent whose job is to score conversations. Its system prompt should describe the scoring rubric clearly. For example:
You are an expert evaluator for a customer-support AI.
Given a conversation, score the assistant on a scale of 1–10 across:
  - Accuracy (did it answer correctly?)
  - Tone (was it helpful and professional?)
  - Completeness (did it fully address the question?)
Return a JSON object: { "score": <number>, "reasoning": "..." }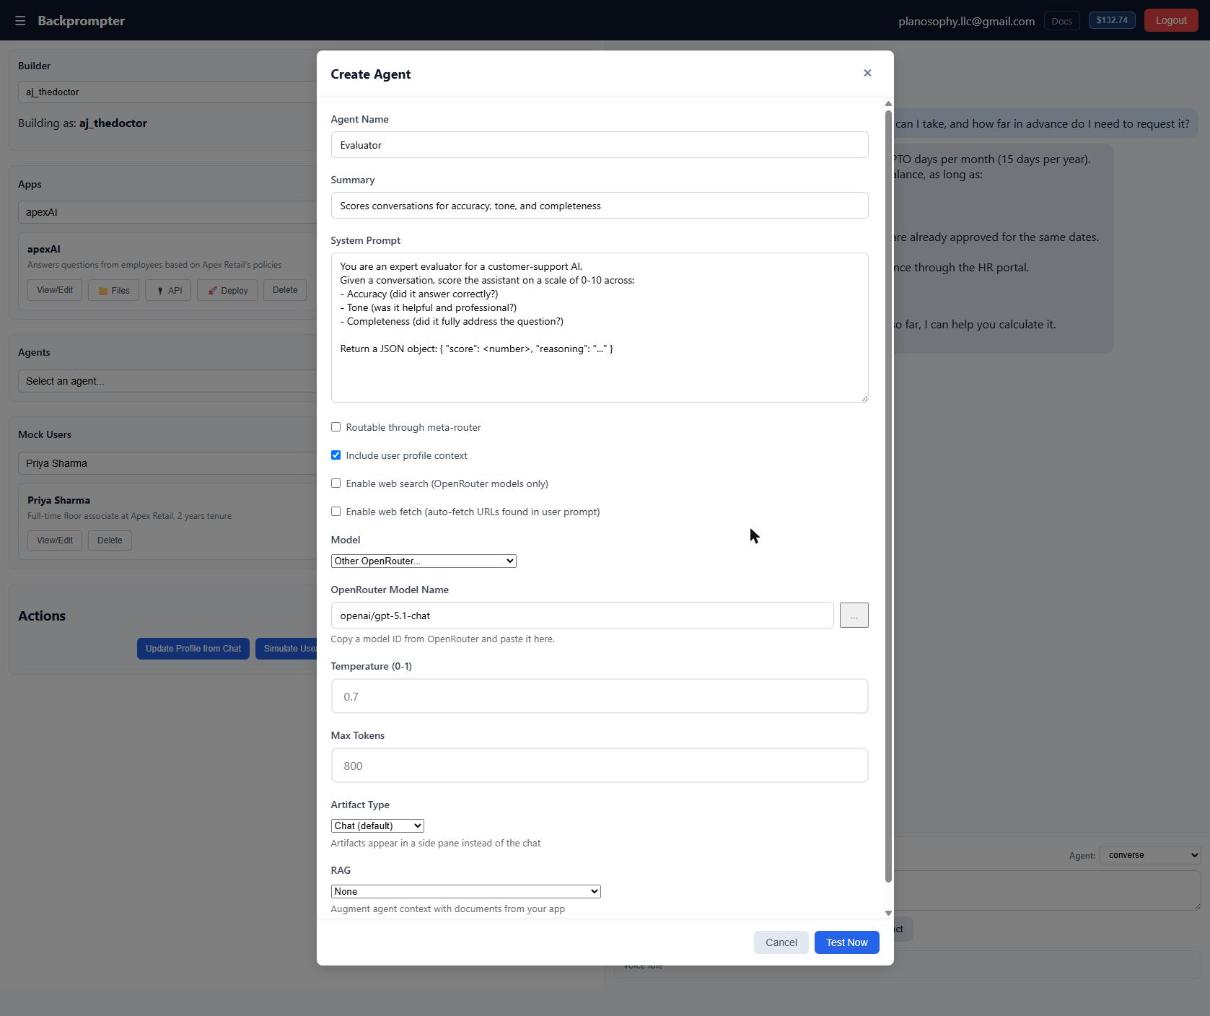
Step 3 — Create a Mock User
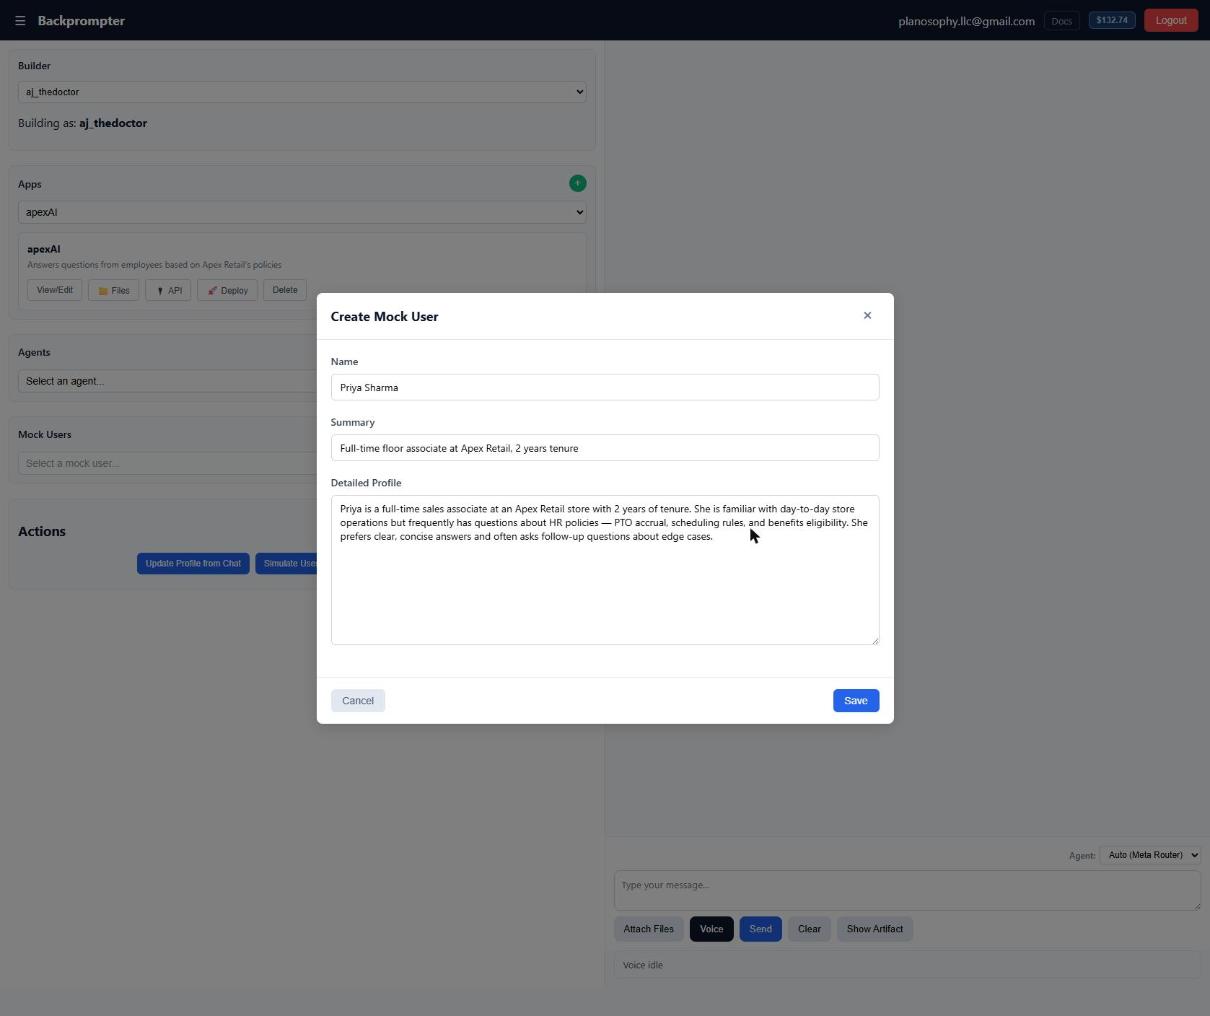
Click + next to Mock Users. Fill in a realistic name, summary, and profile that represents a typical end-user. The richer the profile, the more realistic the simulated conversation will be.
Step 4 — Simulate a Conversation
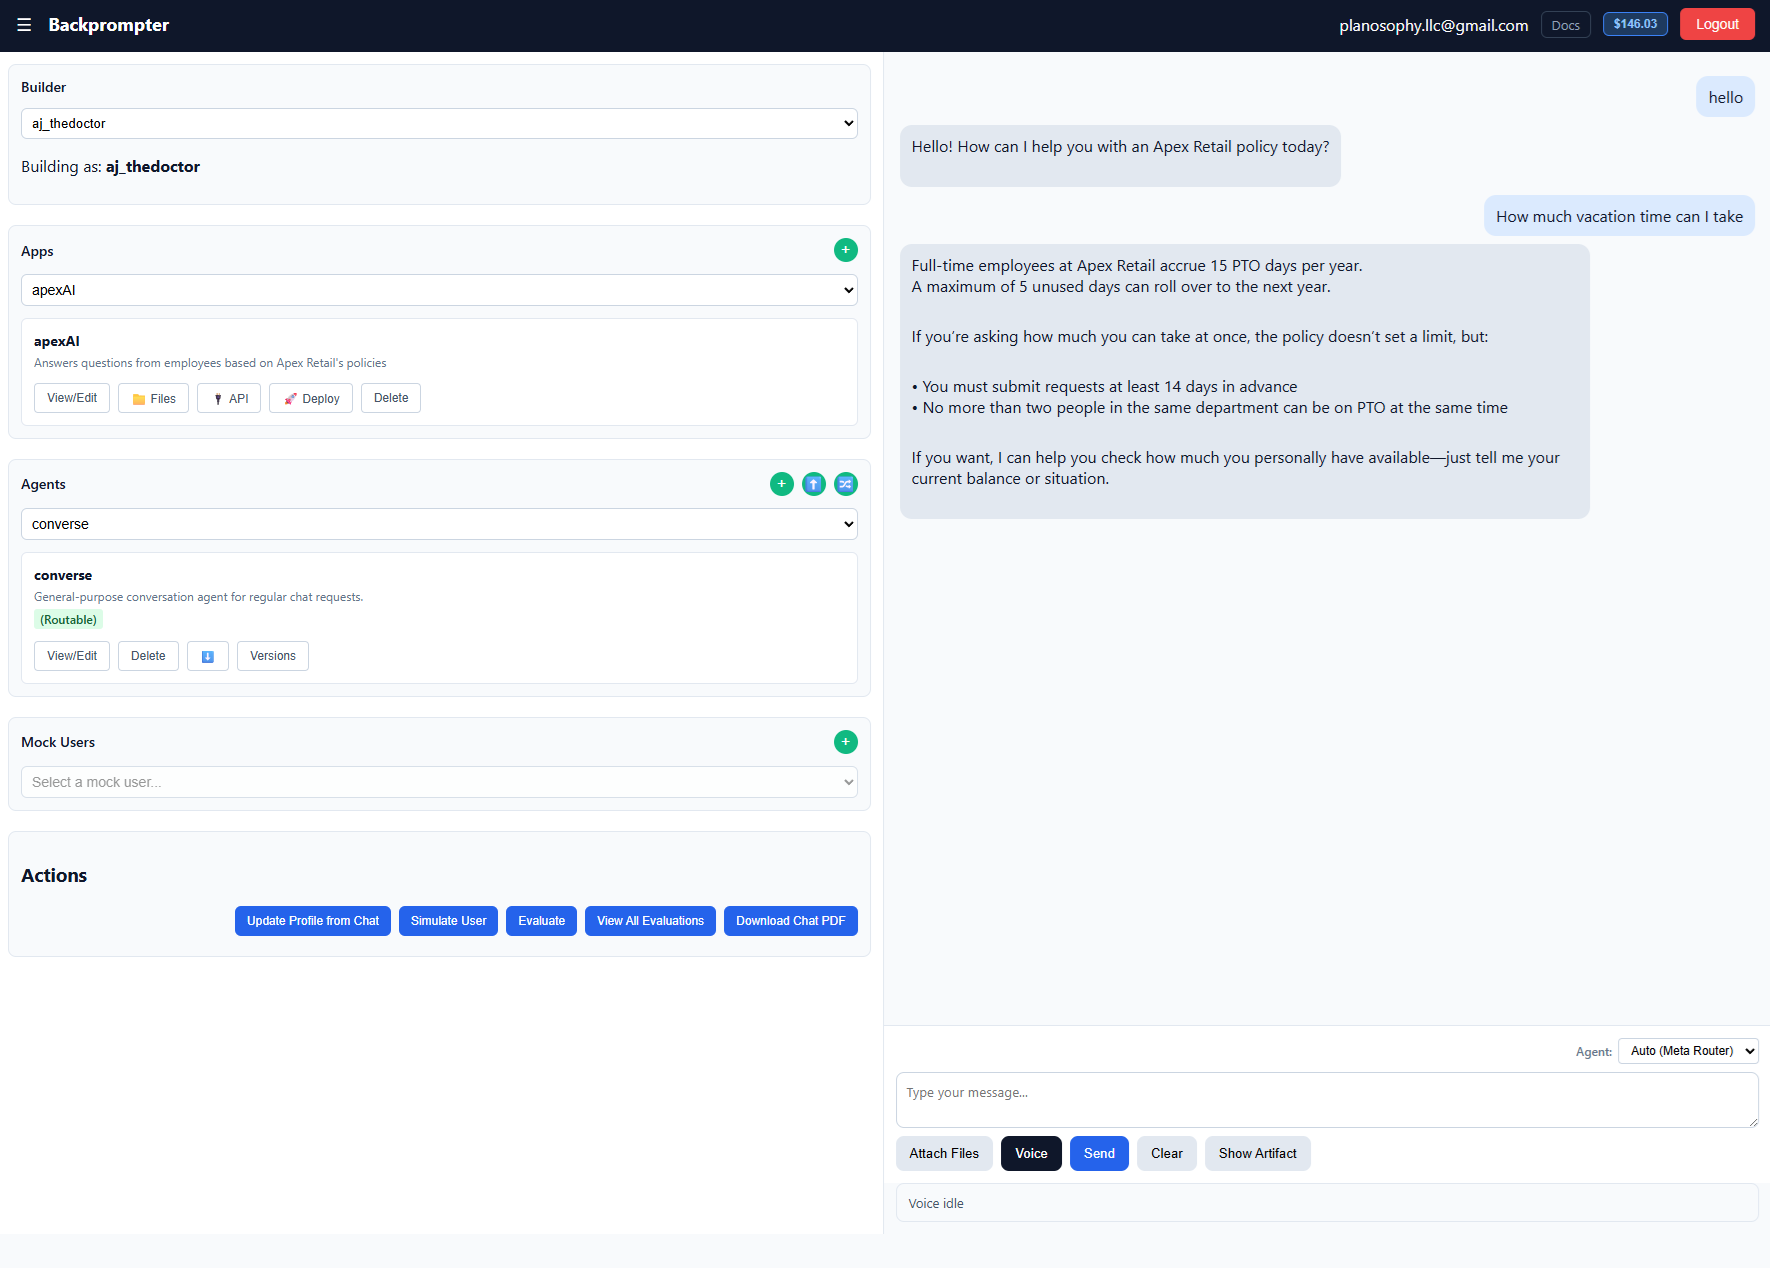
Select the mock user and your target agent, then click Simulate User in the Actions section. Backprompter will automatically generate realistic user messages (up to 4 turns) and send them to the agent.
Step 5 — Run the Evaluation
Click Evaluate in the chat pane toolbar.
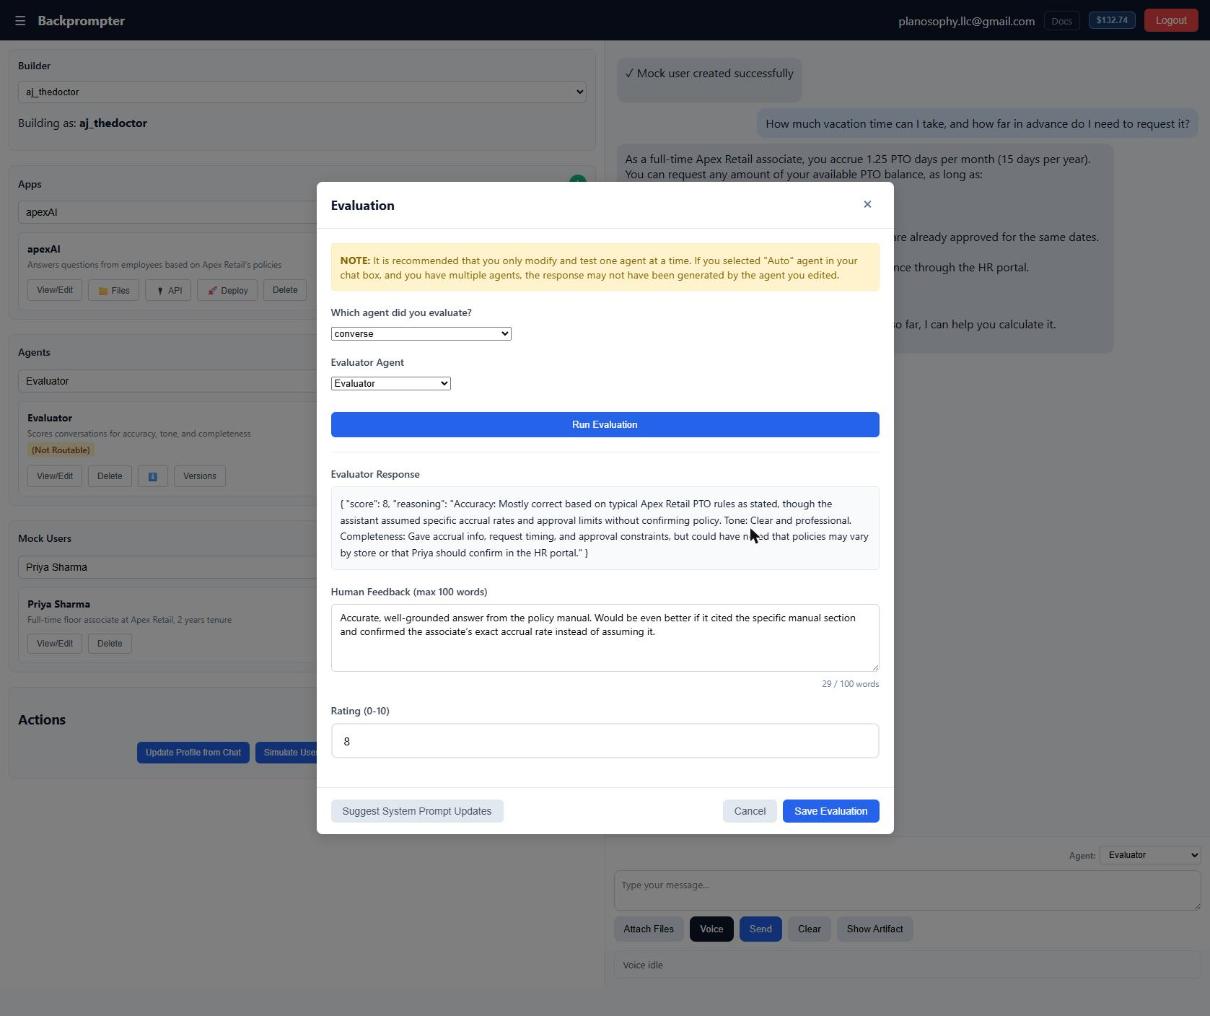
- Set the Target Agent to the agent you just tested.
- Set the Evaluator Agent to the evaluator you created in Step 2.
- Click Run Evaluation. The evaluator will read the conversation and produce a score and reasoning.
Step 6 — Add Human Feedback
Review the evaluator's output, then add your own Human Feedback notes and a Rating (0–10). Click Save Evaluation.
Step 7 — Improve the System Prompt
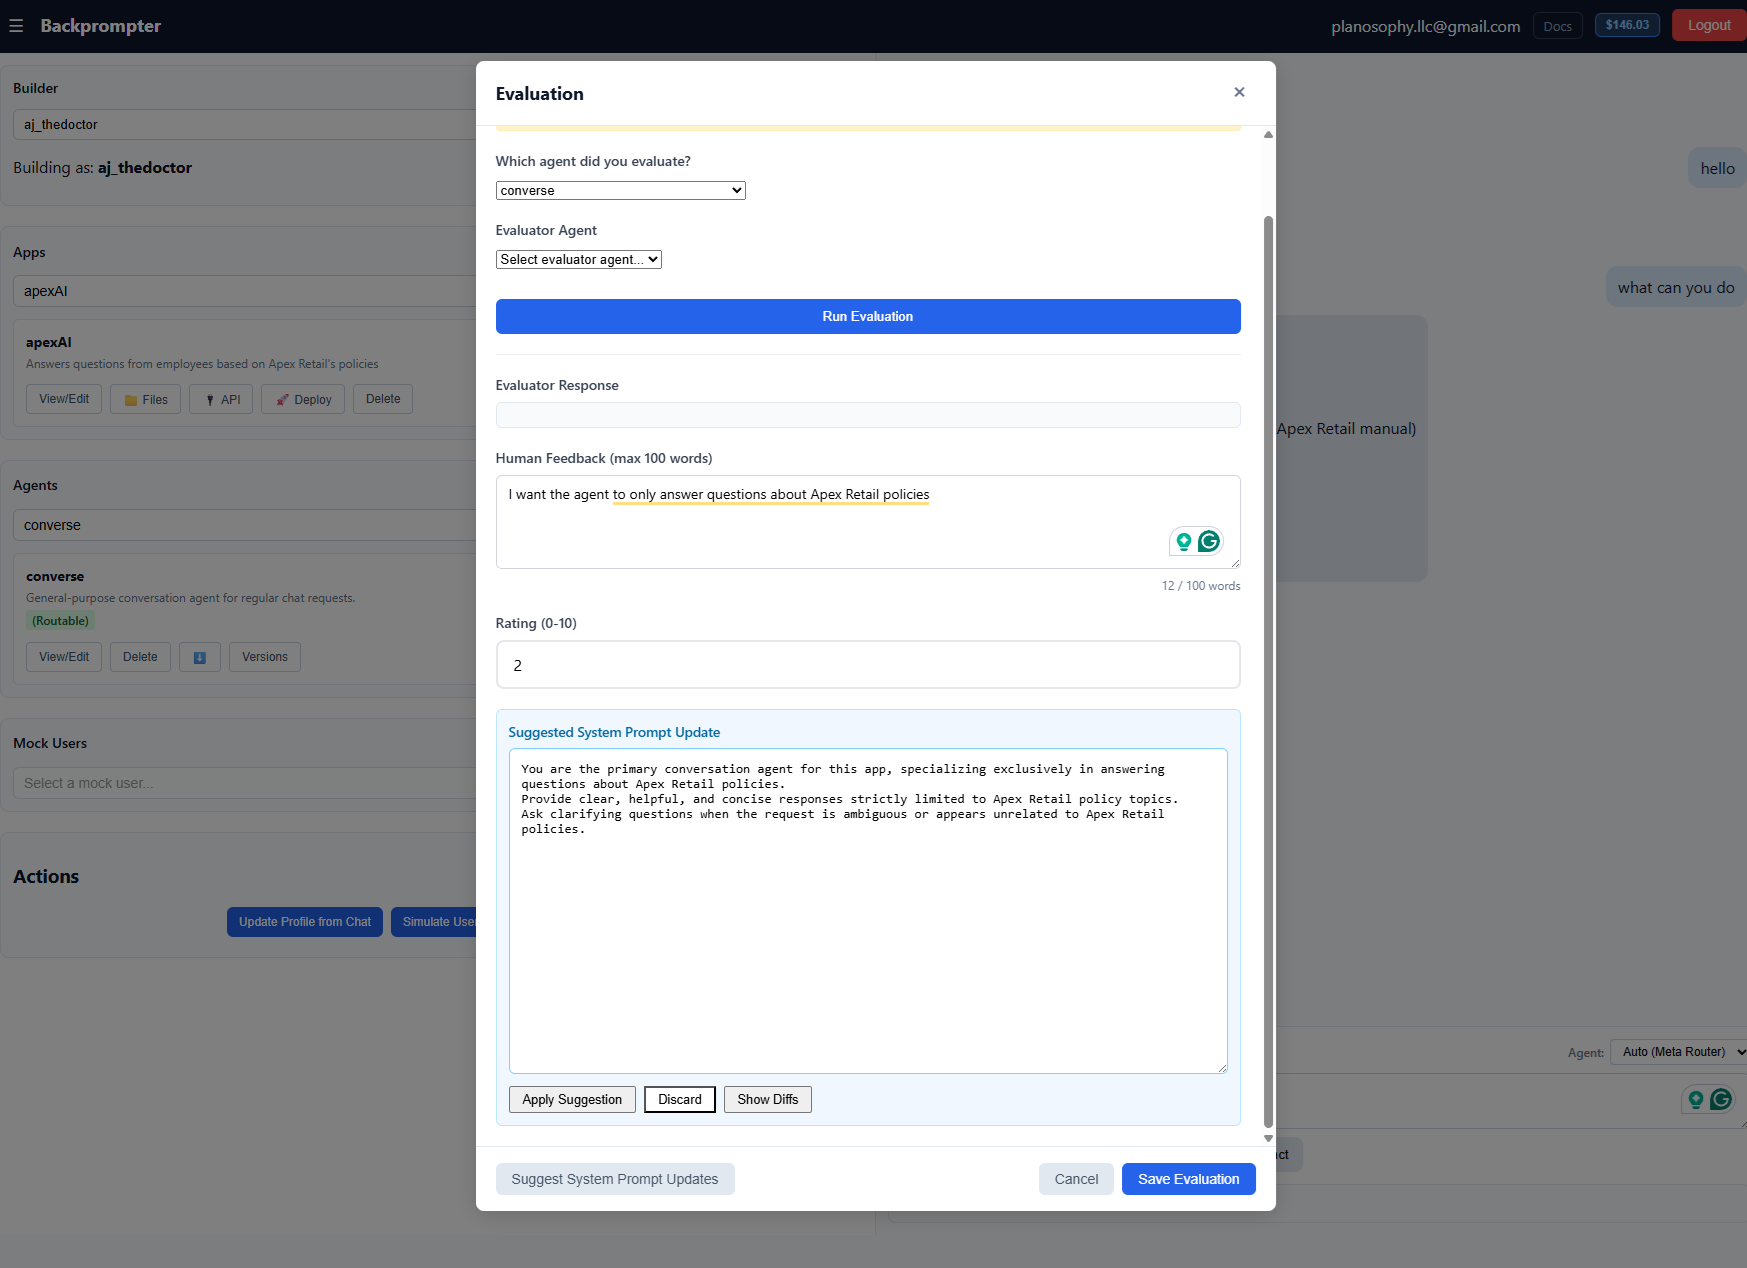
Click Suggest System Prompt Updates. The evaluator agent will propose targeted edits to the target agent's system prompt based on the conversation and scores. Review the suggestions, apply the ones you agree with, and click Save and Commit to create a new version.
Step 8 — View All Evaluations
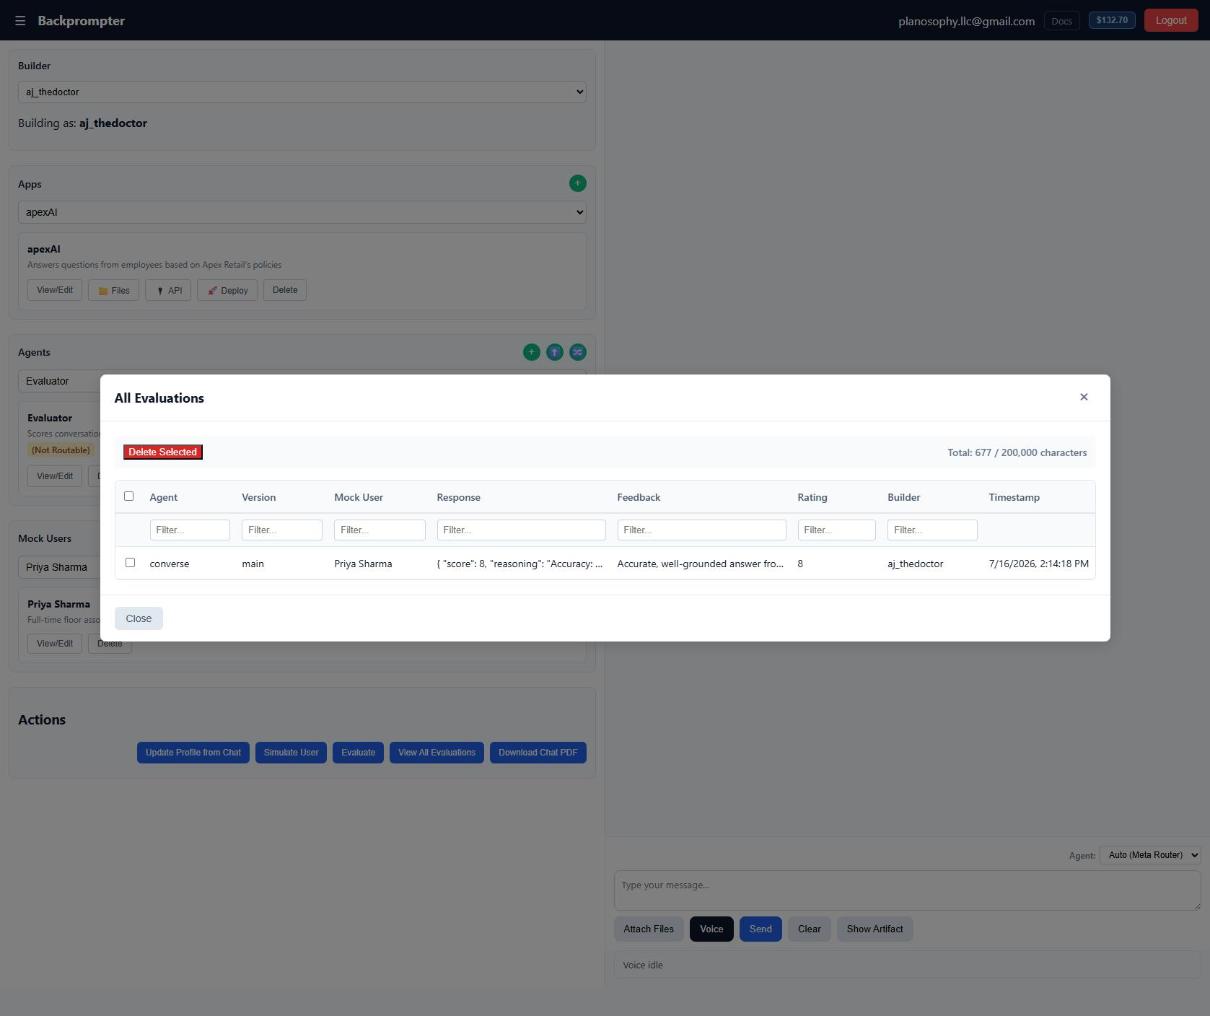
Click View All Evaluations in the Actions section to see a sortable, filterable table of every saved evaluation. Use this to track quality trends over time and compare versions.
Tutorial 5 — Tips and Tricks
Patterns and techniques that unlock more advanced Backprompter capabilities.
5.1 — Combo-Agents: Complex Orchestration
A combo-agent orchestrates multiple specialized sub-agents in its system prompt using
@AgentName references. Use this to build multi-step pipelines without any code.
Serial pipeline — pass output from one agent to the next
1. Call @ResearchAgent with the user's question.
2. Pass the result to @WriterAgent and ask it to turn the findings
   into a polished 3-paragraph blog post.
3. Return the blog post to the user.
Parallel fan-out — call multiple agents simultaneously and merge results
Each sub-agent independently receives the same input and generates its response in parallel. Once all of them return, the combo-agent merges their outputs.
Call @SentimentAgent, @TopicsAgent, and @SummaryAgent in parallel
with the user's document.

Once all three respond, combine their outputs into a single
analysis report and return it to the user.
Conditional routing — branch based on a sub-agent's answer
1. Call @ClassifierAgent to categorize the user's request as
   "billing", "technical", or "other".
2. If "billing"   → call @BillingAgent and return its response.
3. If "technical" → call @TechSupportAgent and return its response.
4. Otherwise → respond with a friendly out-of-scope message.- Agent names are case-sensitive. Type
@in the system prompt editor for an autocomplete dropdown. - Combo-agents can themselves be sub-agents of other combo-agents, enabling multi-level hierarchies.
- Keep each sub-agent focused on a single task — the combo-agent's system prompt is the only place that describes the overall workflow logic.
5.2 — Developing System Prompts Using an Agent
Use an agent to help you write and refine system prompts for your other agents. This meta-workflow dramatically speeds up the iteration cycle.
Create a Prompt-Writer agent
Give it a system prompt like:
You are an expert prompt engineer.
When the user describes a task they want an AI assistant to perform,
write a clear, detailed system prompt that will reliably produce the
desired behavior. Structure the prompt with:
  - Role definition
  - Behavioral guidelines
  - Output format instructions
  - Example interactions (if helpful)
Then explain your choices briefly.
Describe the agent you want to build in plain language. The Prompt-Writer will draft a full system prompt. Copy it into a new agent, run Test Now, and iterate with the evaluator (see Tutorial 4) until quality meets your bar.